> ## Documentation Index
> Fetch the complete documentation index at: https://docs.saucerswap.finance/llms.txt
> Use this file to discover all available pages before exploring further.
# SaucerSwap V2
## Manual Liquidity Provision
### How to Create a Manual Position: Instructional Video
### How to Create a Manual Position: Written Guide
1\. **Prerequisites**
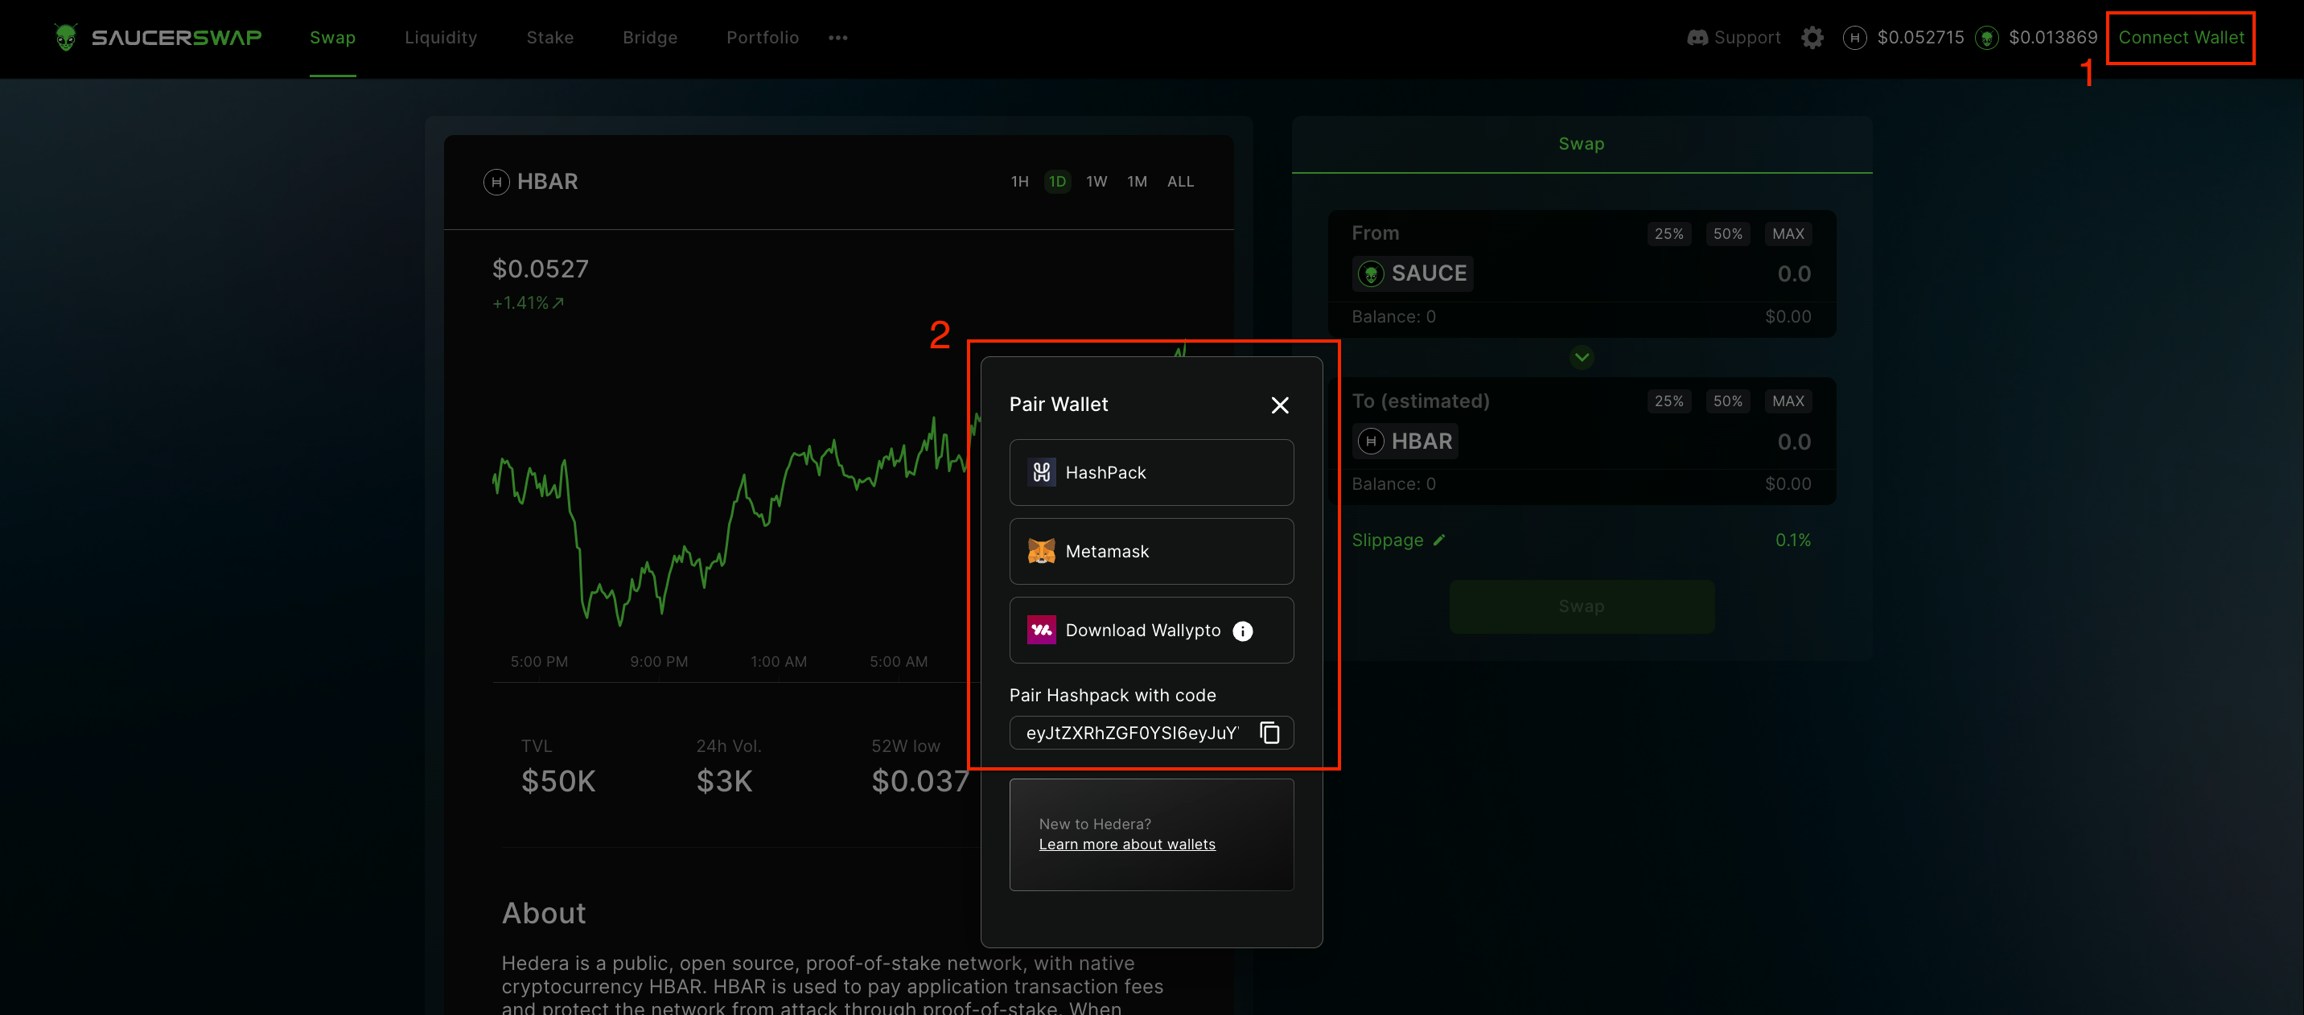
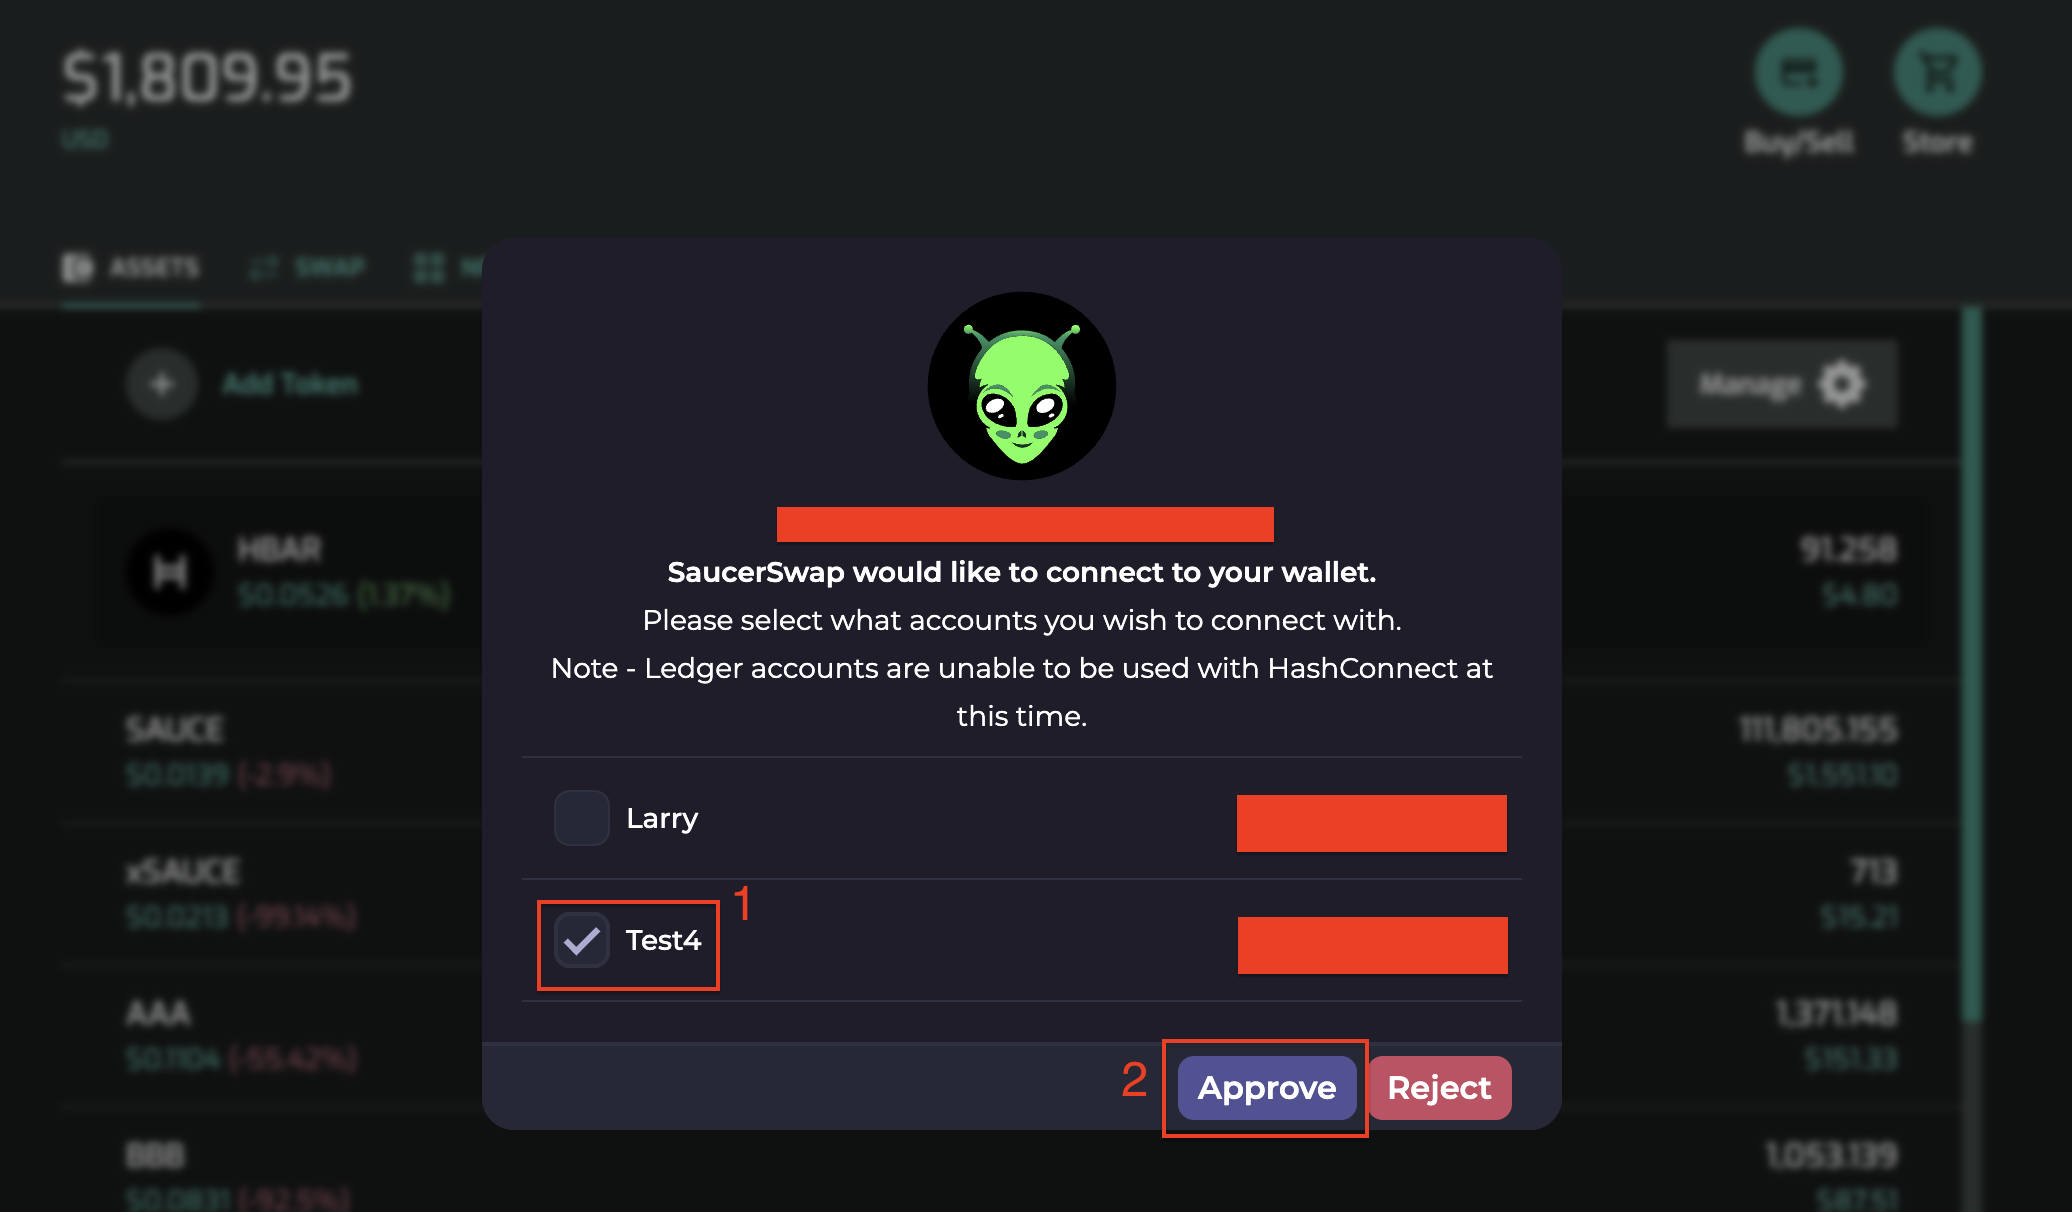
* Launch the web-app and connect your [wallet](/get-started/hedera-guide/create-hedera-wallet).
* Ensure you have sufficient [HBAR](/get-started/hedera-guide/get-hbar) for network fees and tokens for liquidity provision.
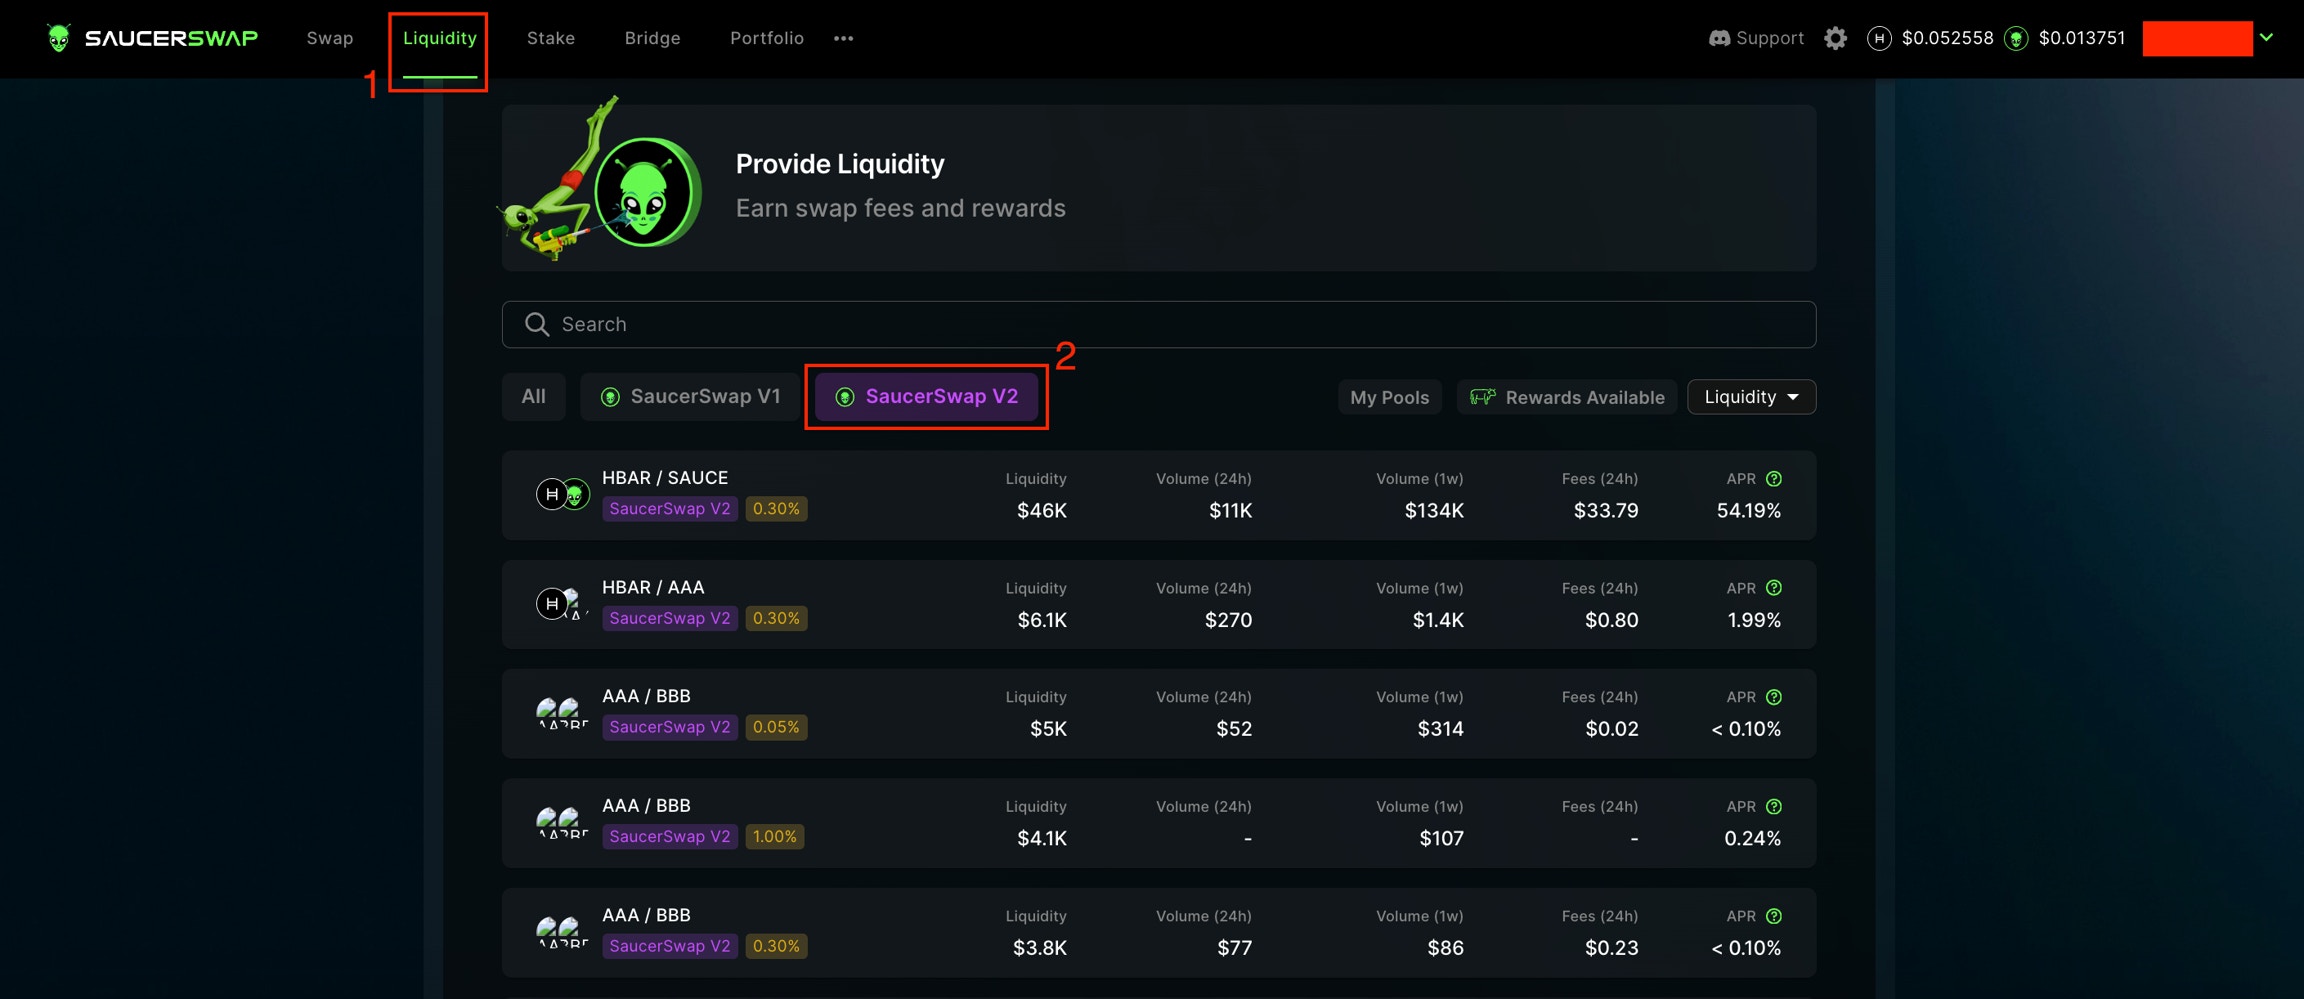
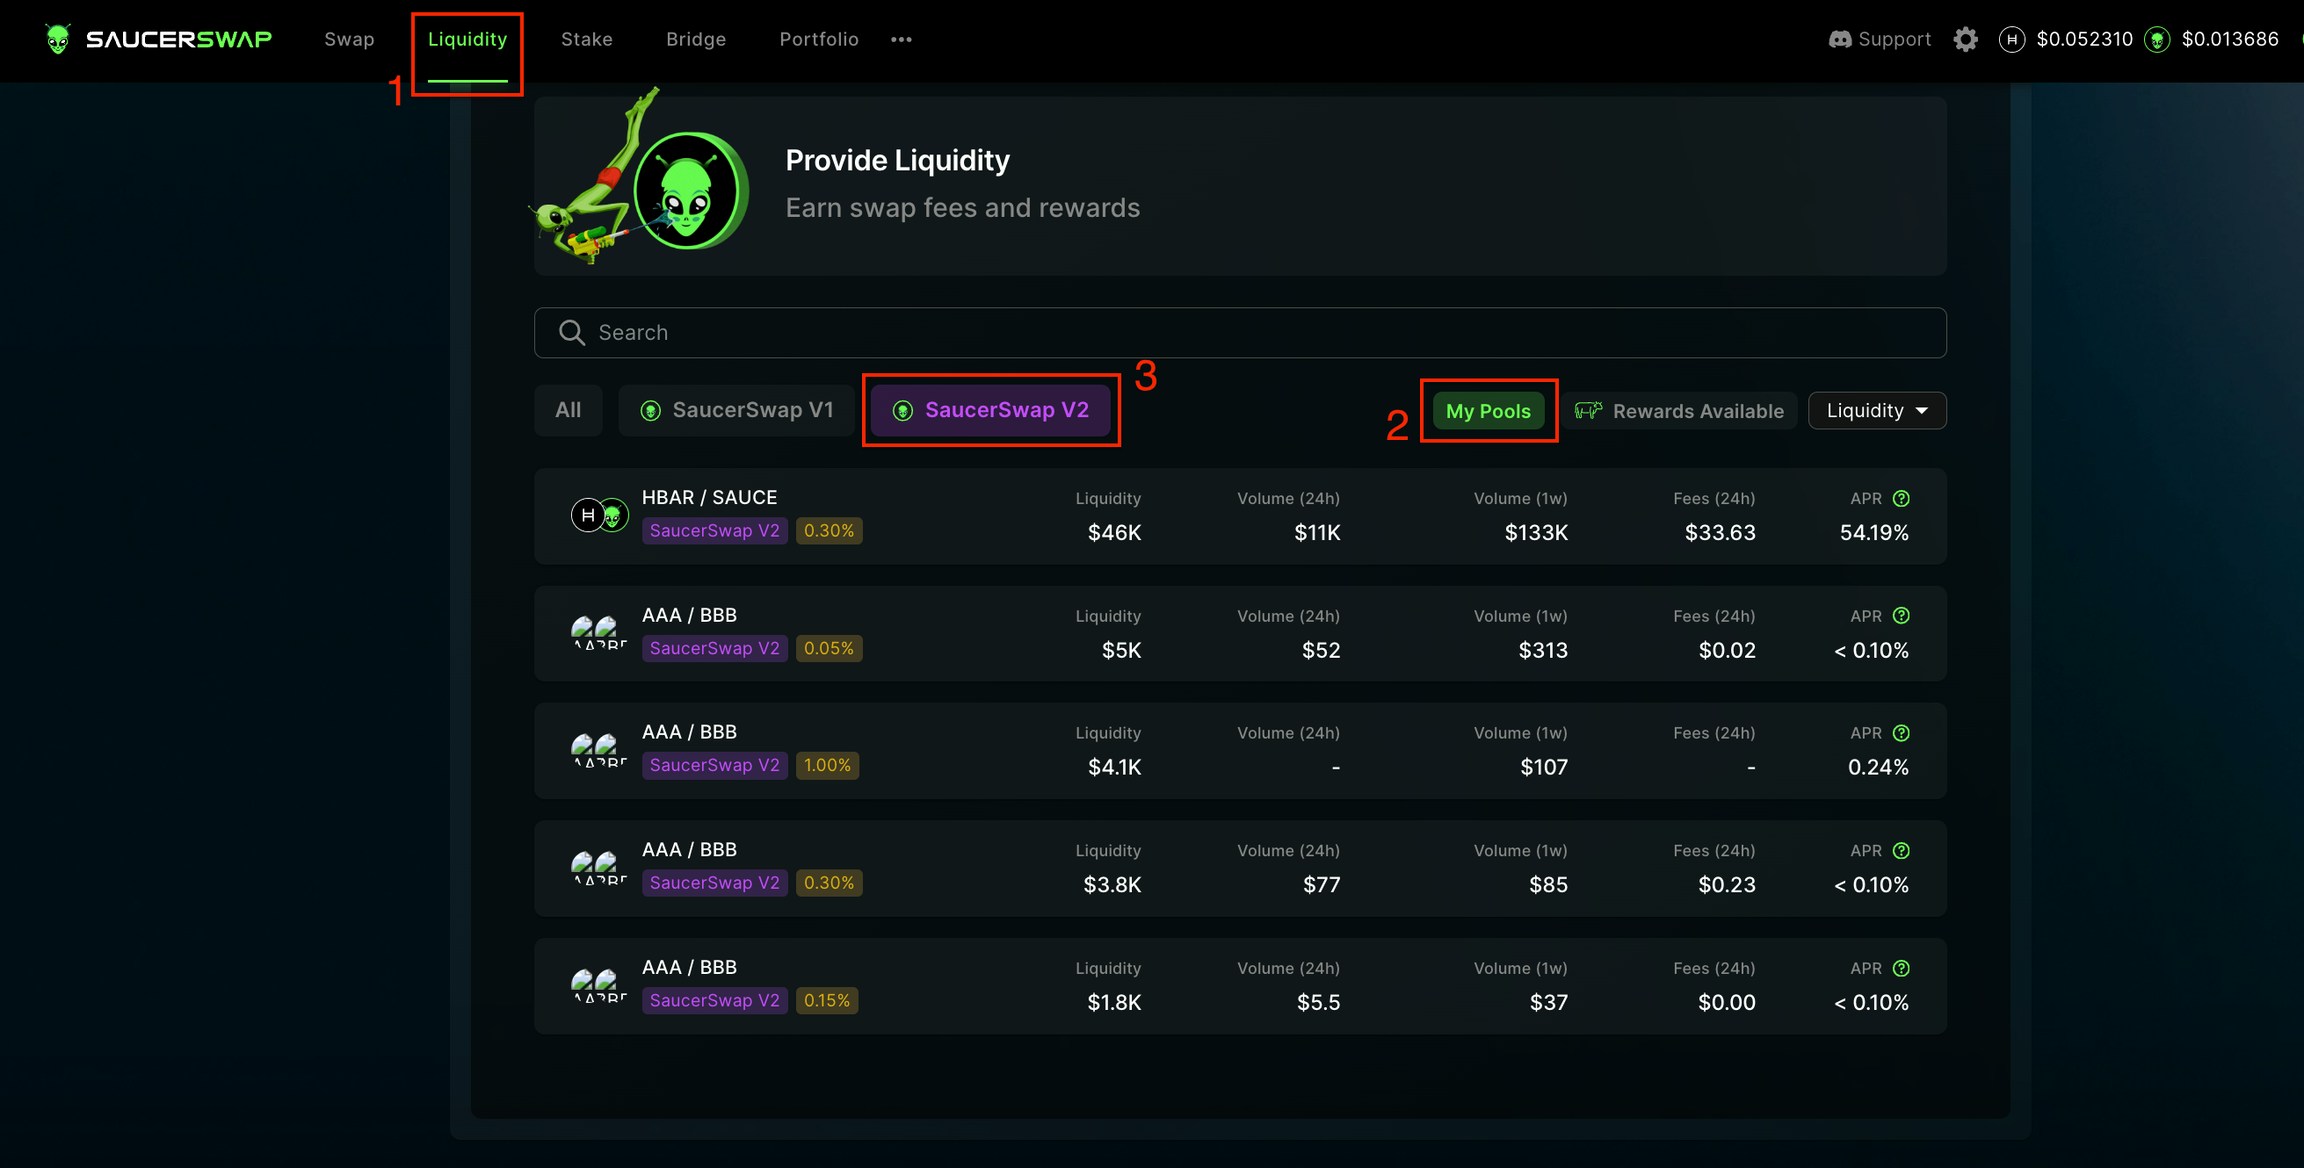
2\. **Locate Pool**
* Navigate to the "Liquidity" page.
* Select the "SaucerSwap V2" tab.
* Identify the pool where you want to provide liquidity.
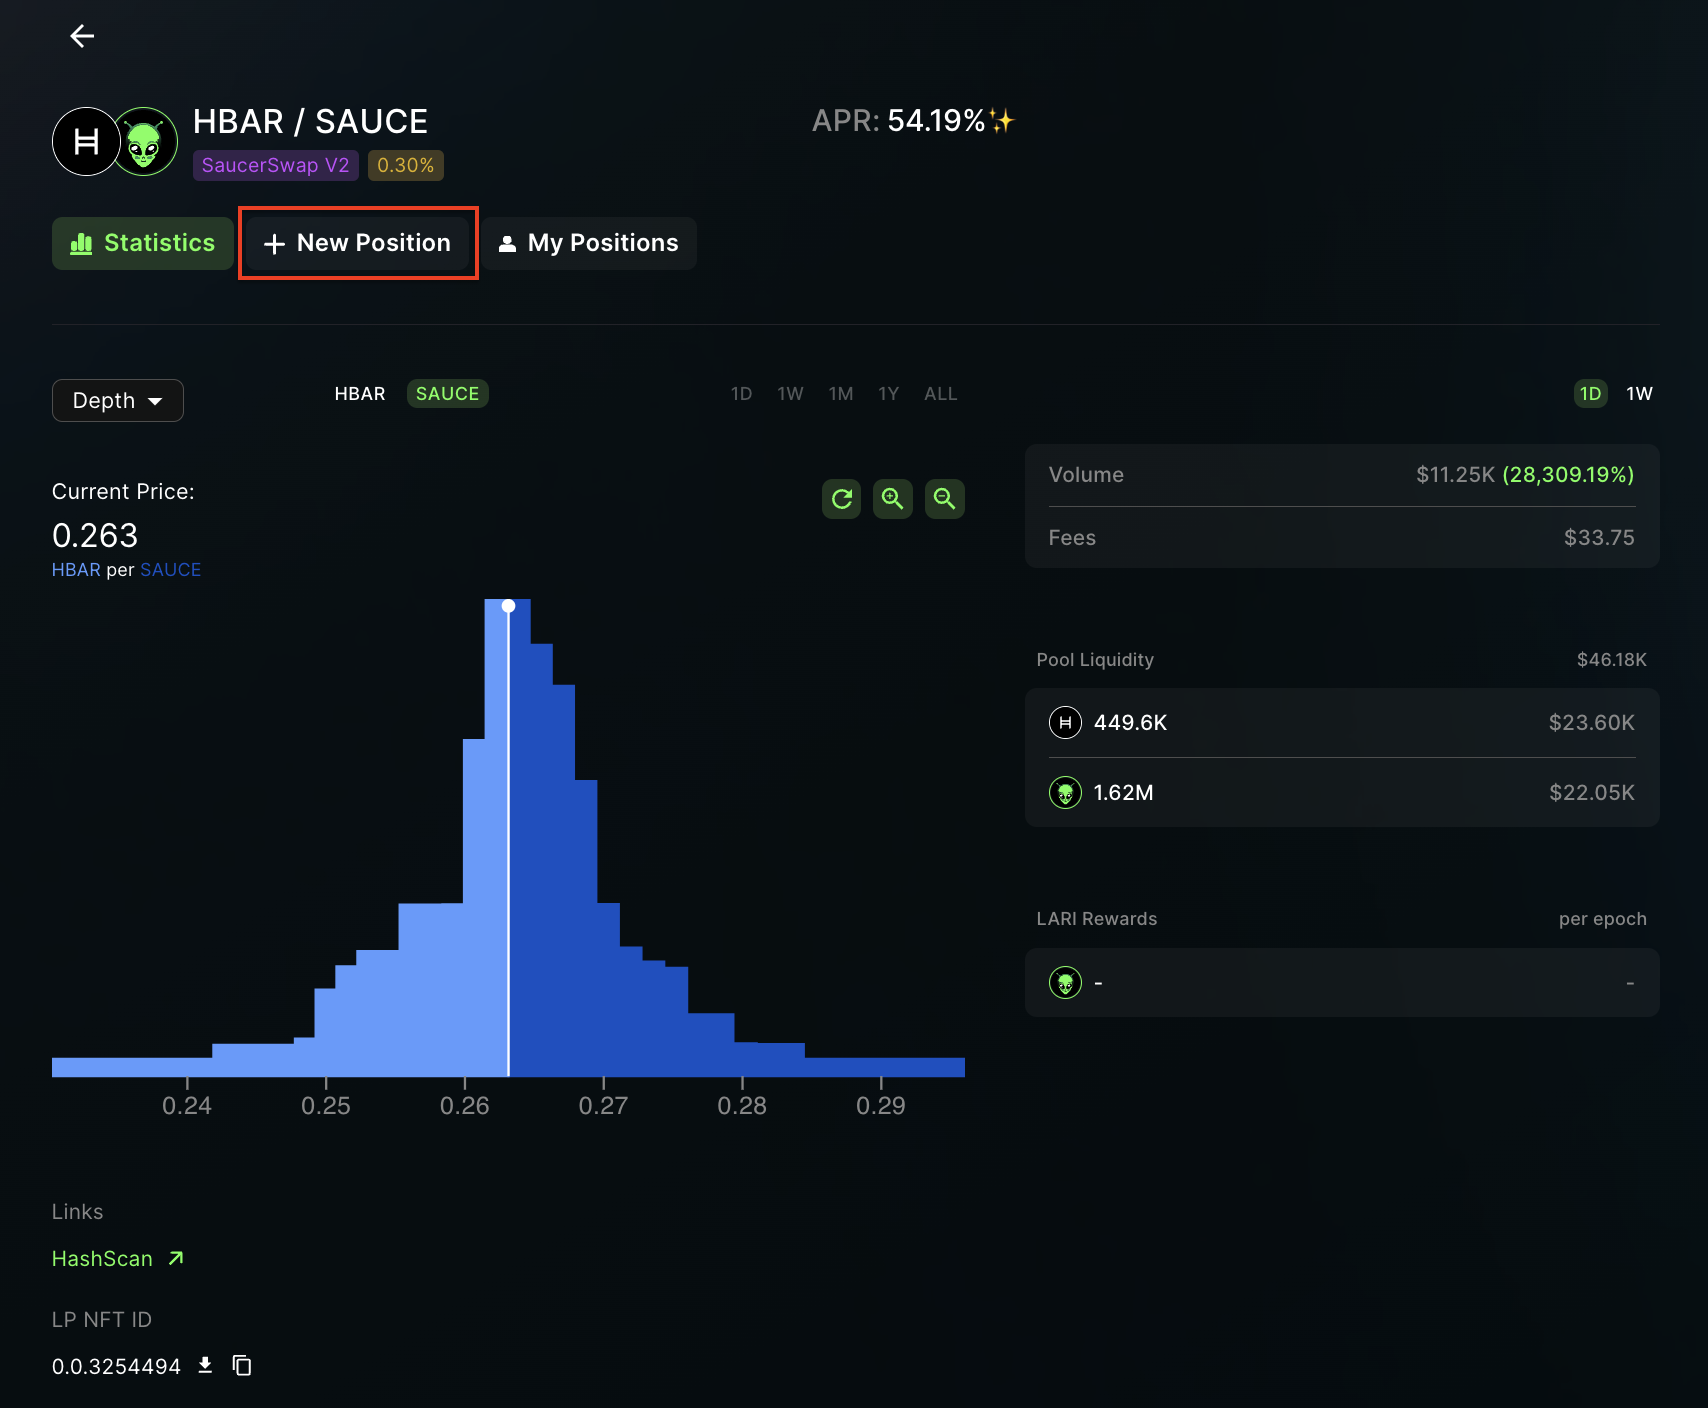
3\. **Create Position**
* Click "New Position."
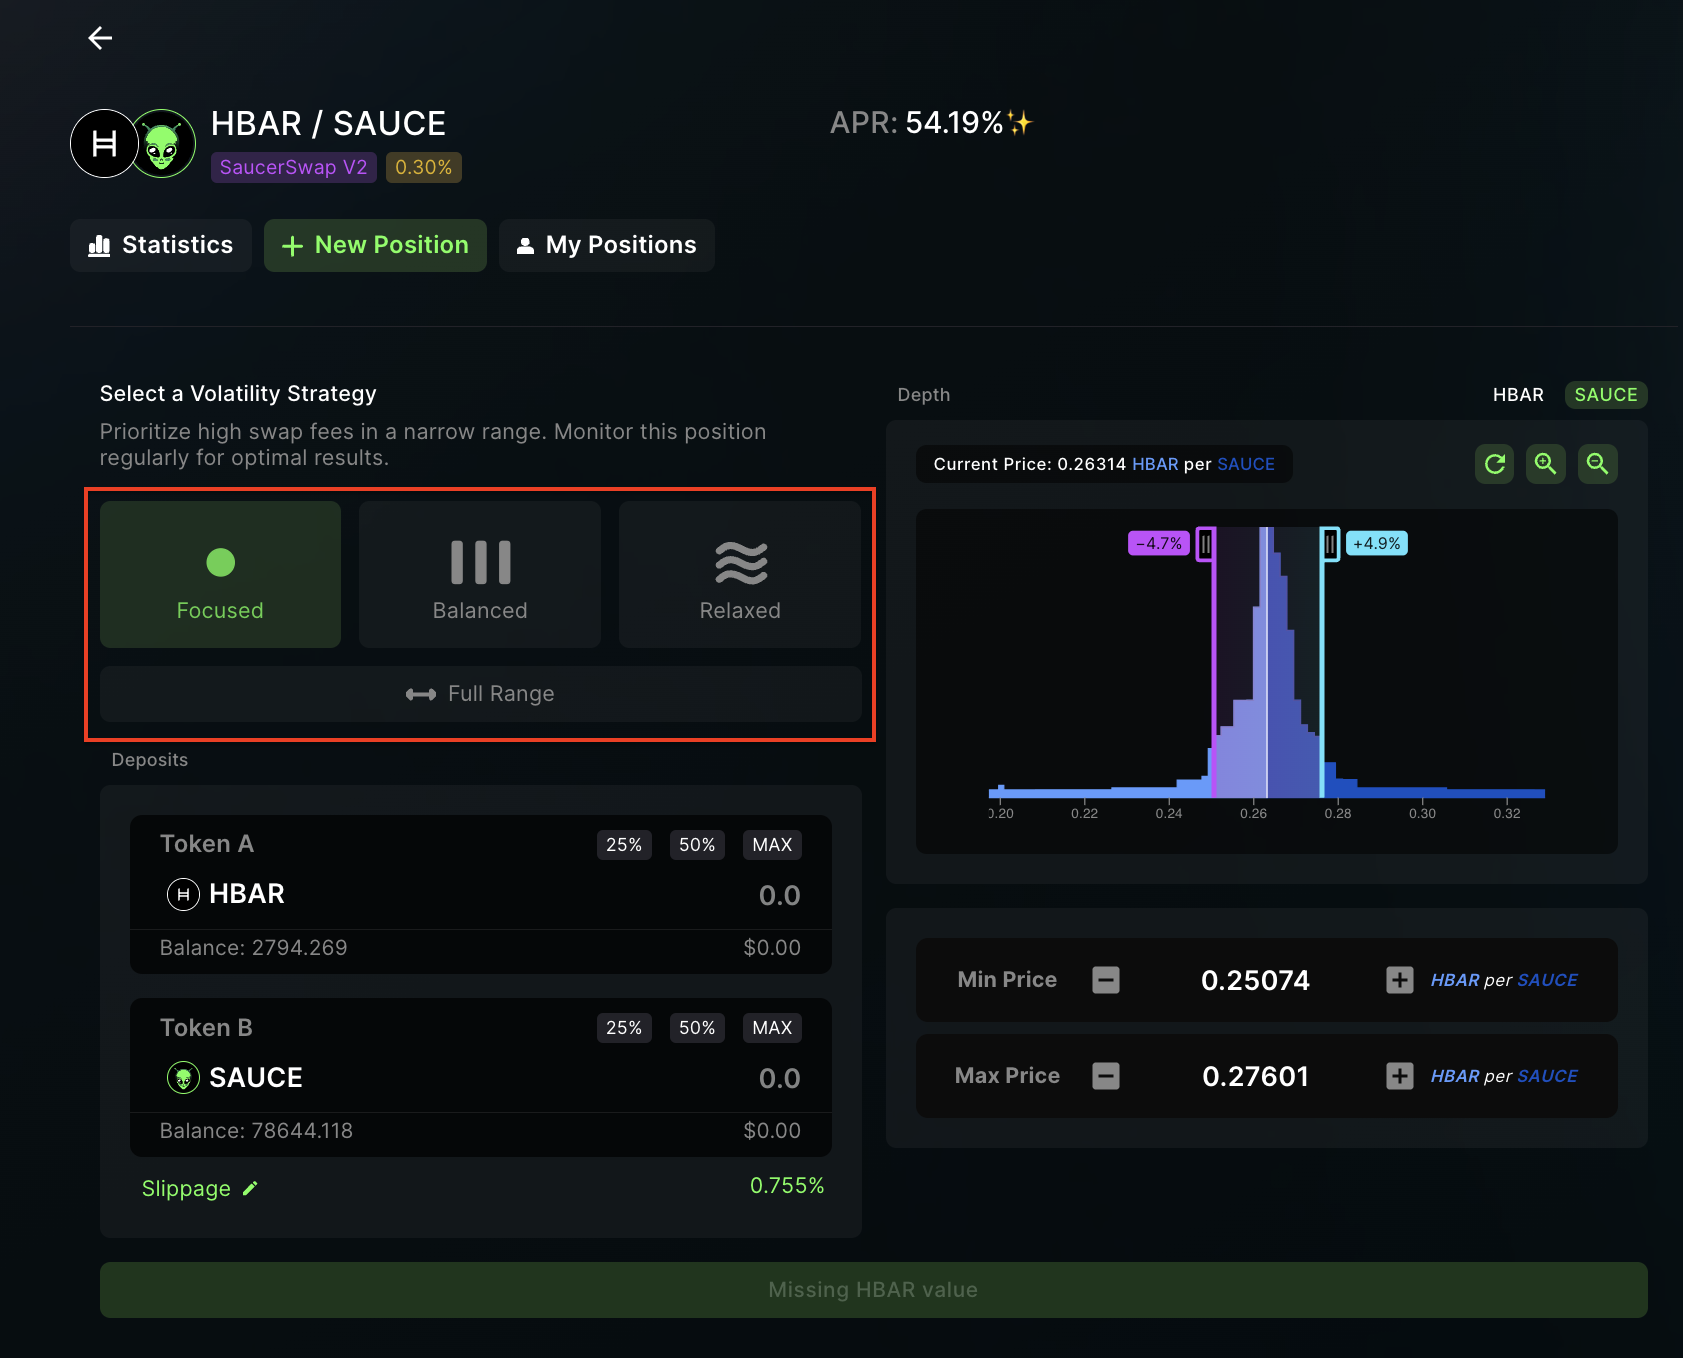
4\. **Set Price Range**
* Setting the price range is a crucial step in concentrated liquidity provision, as it determines the price points at which your liquidity is utilized for trading. Here are the different methods to set the price range:
**Volatility Strategy:** SaucerSwap offers pre-configured volatility strategies such as "Focused," "Balanced," and "Relaxed." Selecting one of these automatically sets your price range.
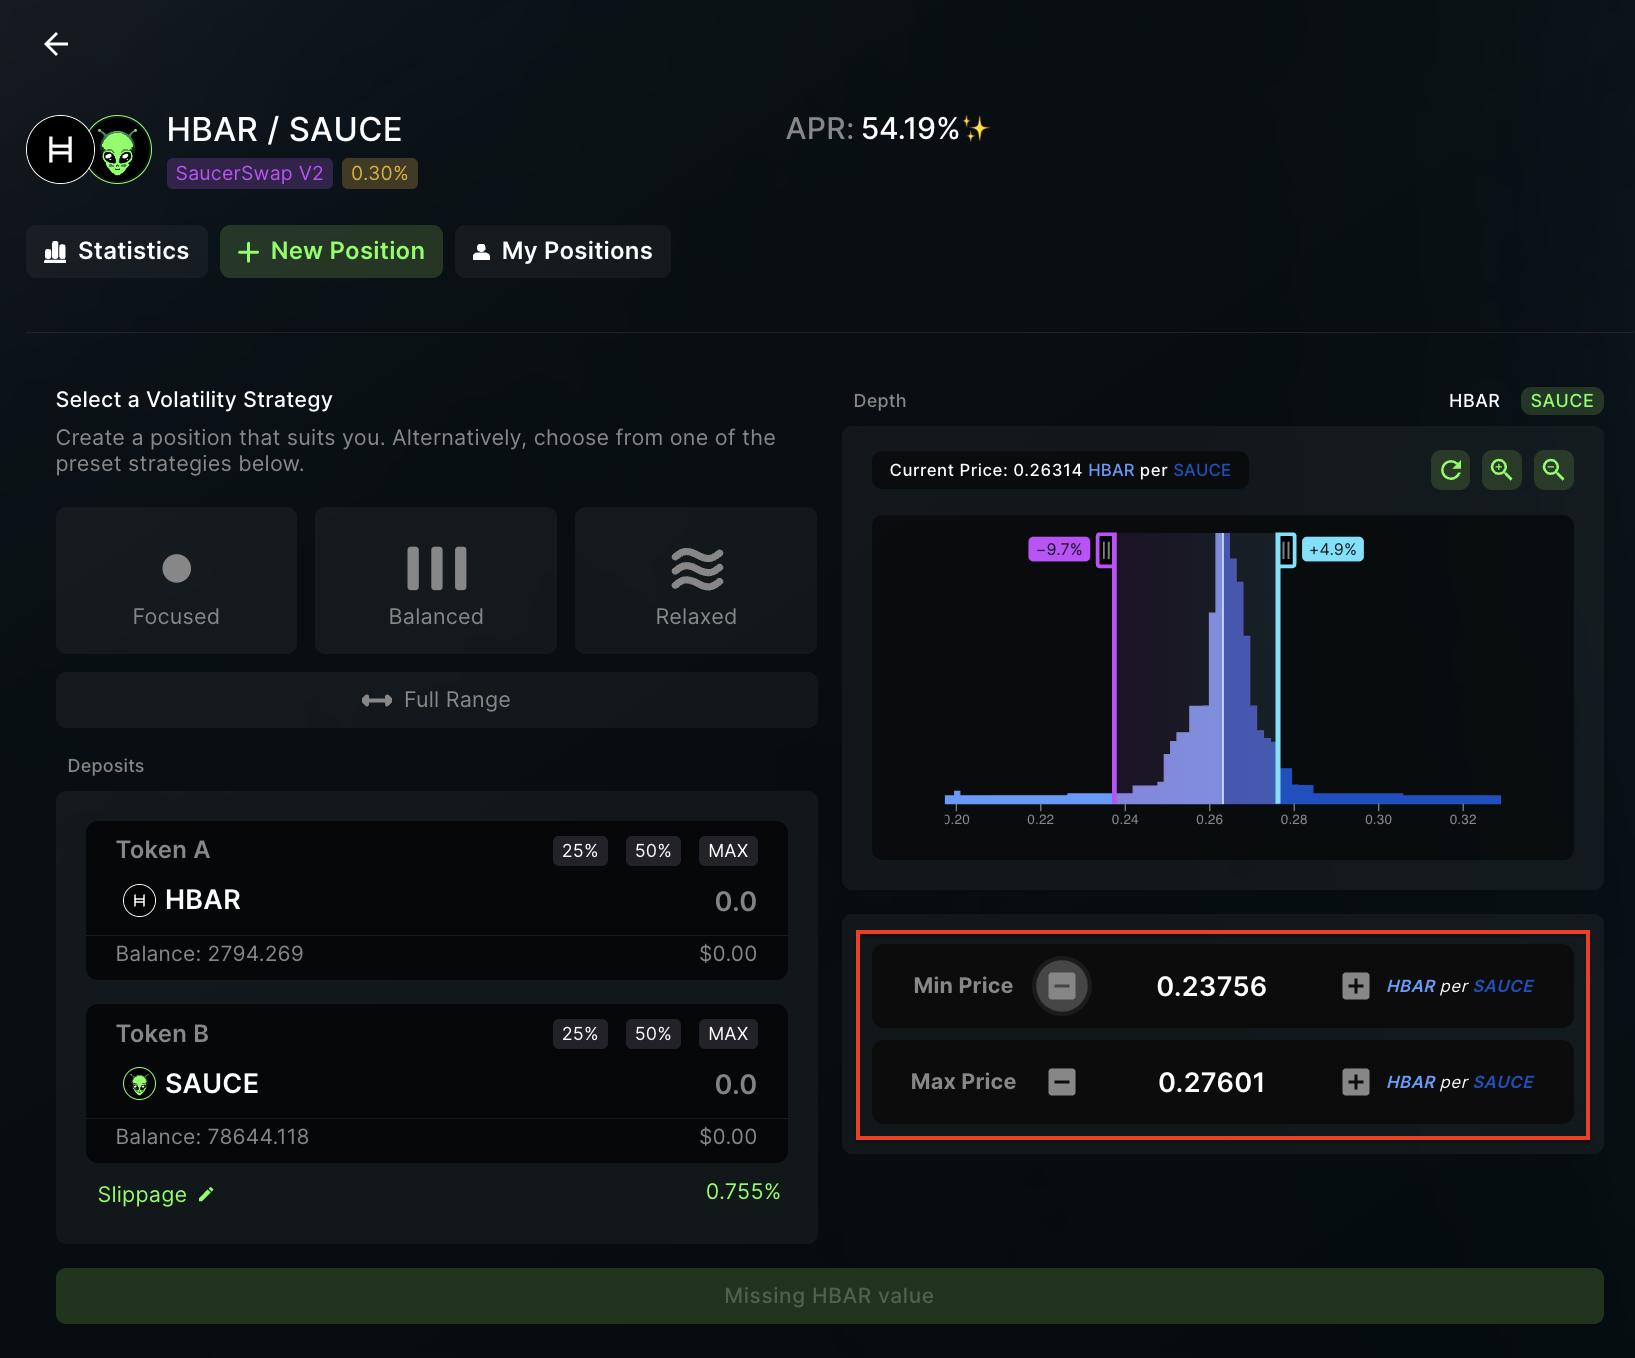
**Manual Input:** Use the `+` and `-` buttons to manually adjust the upper and lower price limits for the position. This gives you more control but requires a good understanding of the token pair’s price dynamics.
**Depth Chart Handles:** The interface offers a graphical depth chart where you can drag handles to set the desired price range. This method provides a visual aid, however it also requires an understanding of the token pair’s price dynamics.
**Limit Order Emulation:** Setting the range entirely to one side (left for lower prices, right for higher prices) effectively acts as a limit order, converting your liquidity from tokenA \<-> tokenB when the price reaches a certain point.
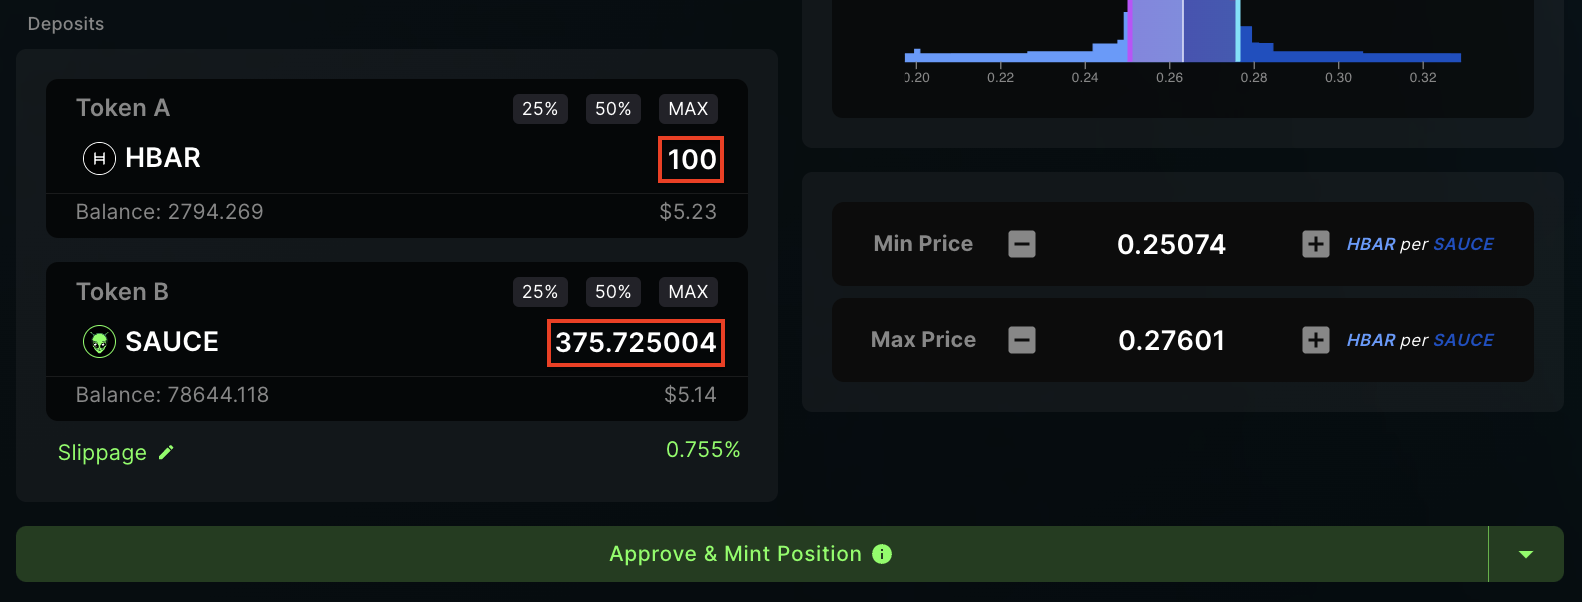
5\. **Deposit Tokens**
* Input the amount of TokenA or TokenB to deposit.
6\. **Finalize**
* Review all info and ensure your slippage tolerance is set appropriately.
* Click "Approve & Mint Position."
* Complete the transaction in your wallet.
### How to Manage a Manual Position: Instructional Video
### How to Manage a Manual Position: Written Guide
1\. **Prerequisites**
* Launch the app and connect your [wallet](/get-started/hedera-guide/create-hedera-wallet).
* Ensure you have sufficient [HBAR](/get-started/hedera-guide/get-hbar) for network fees and existing liquidity positions.
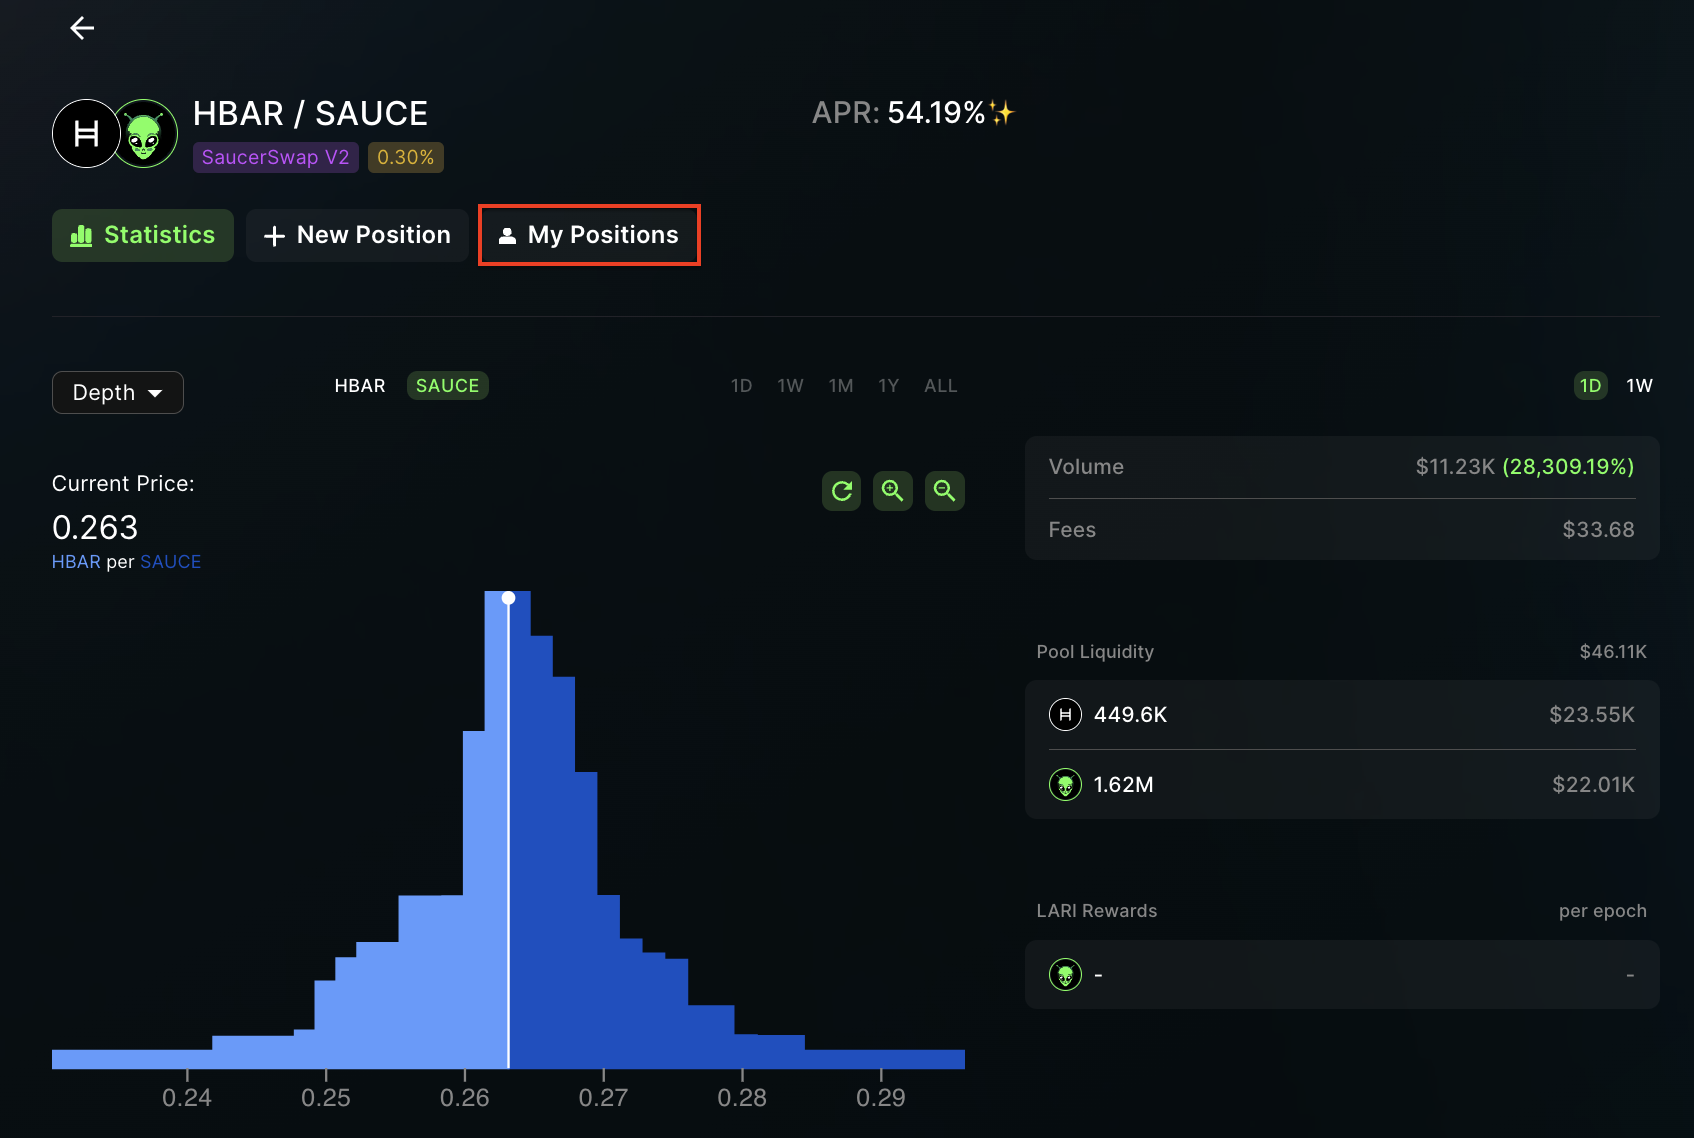
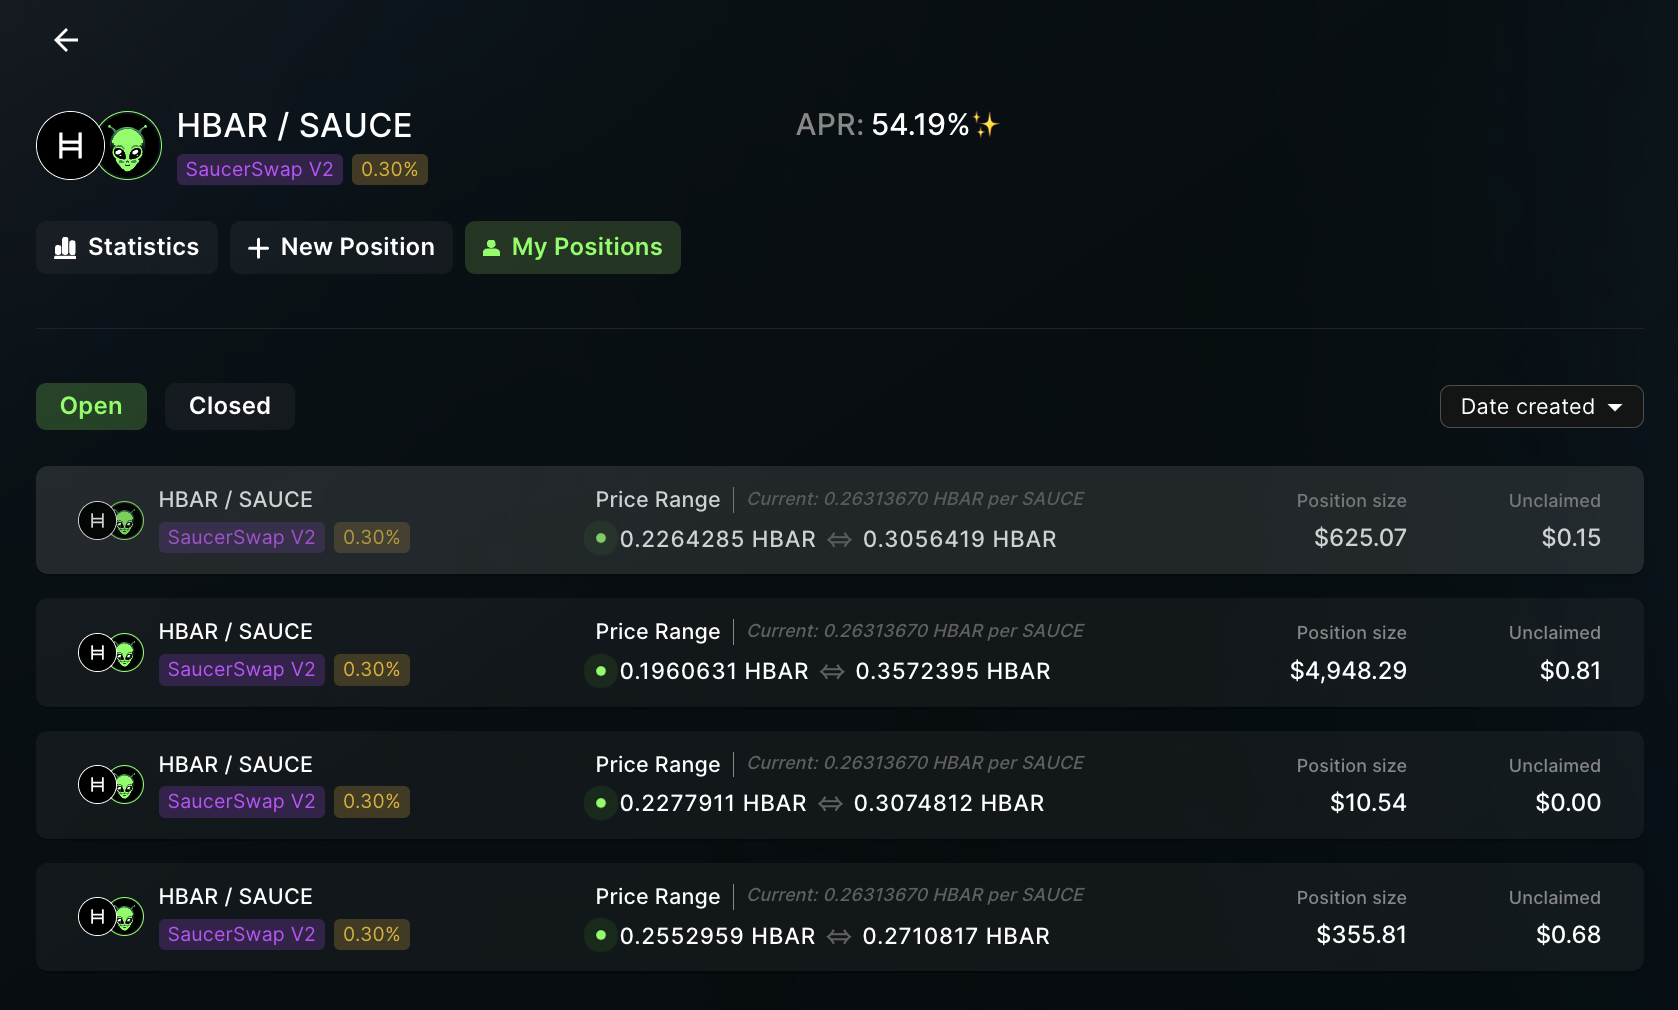
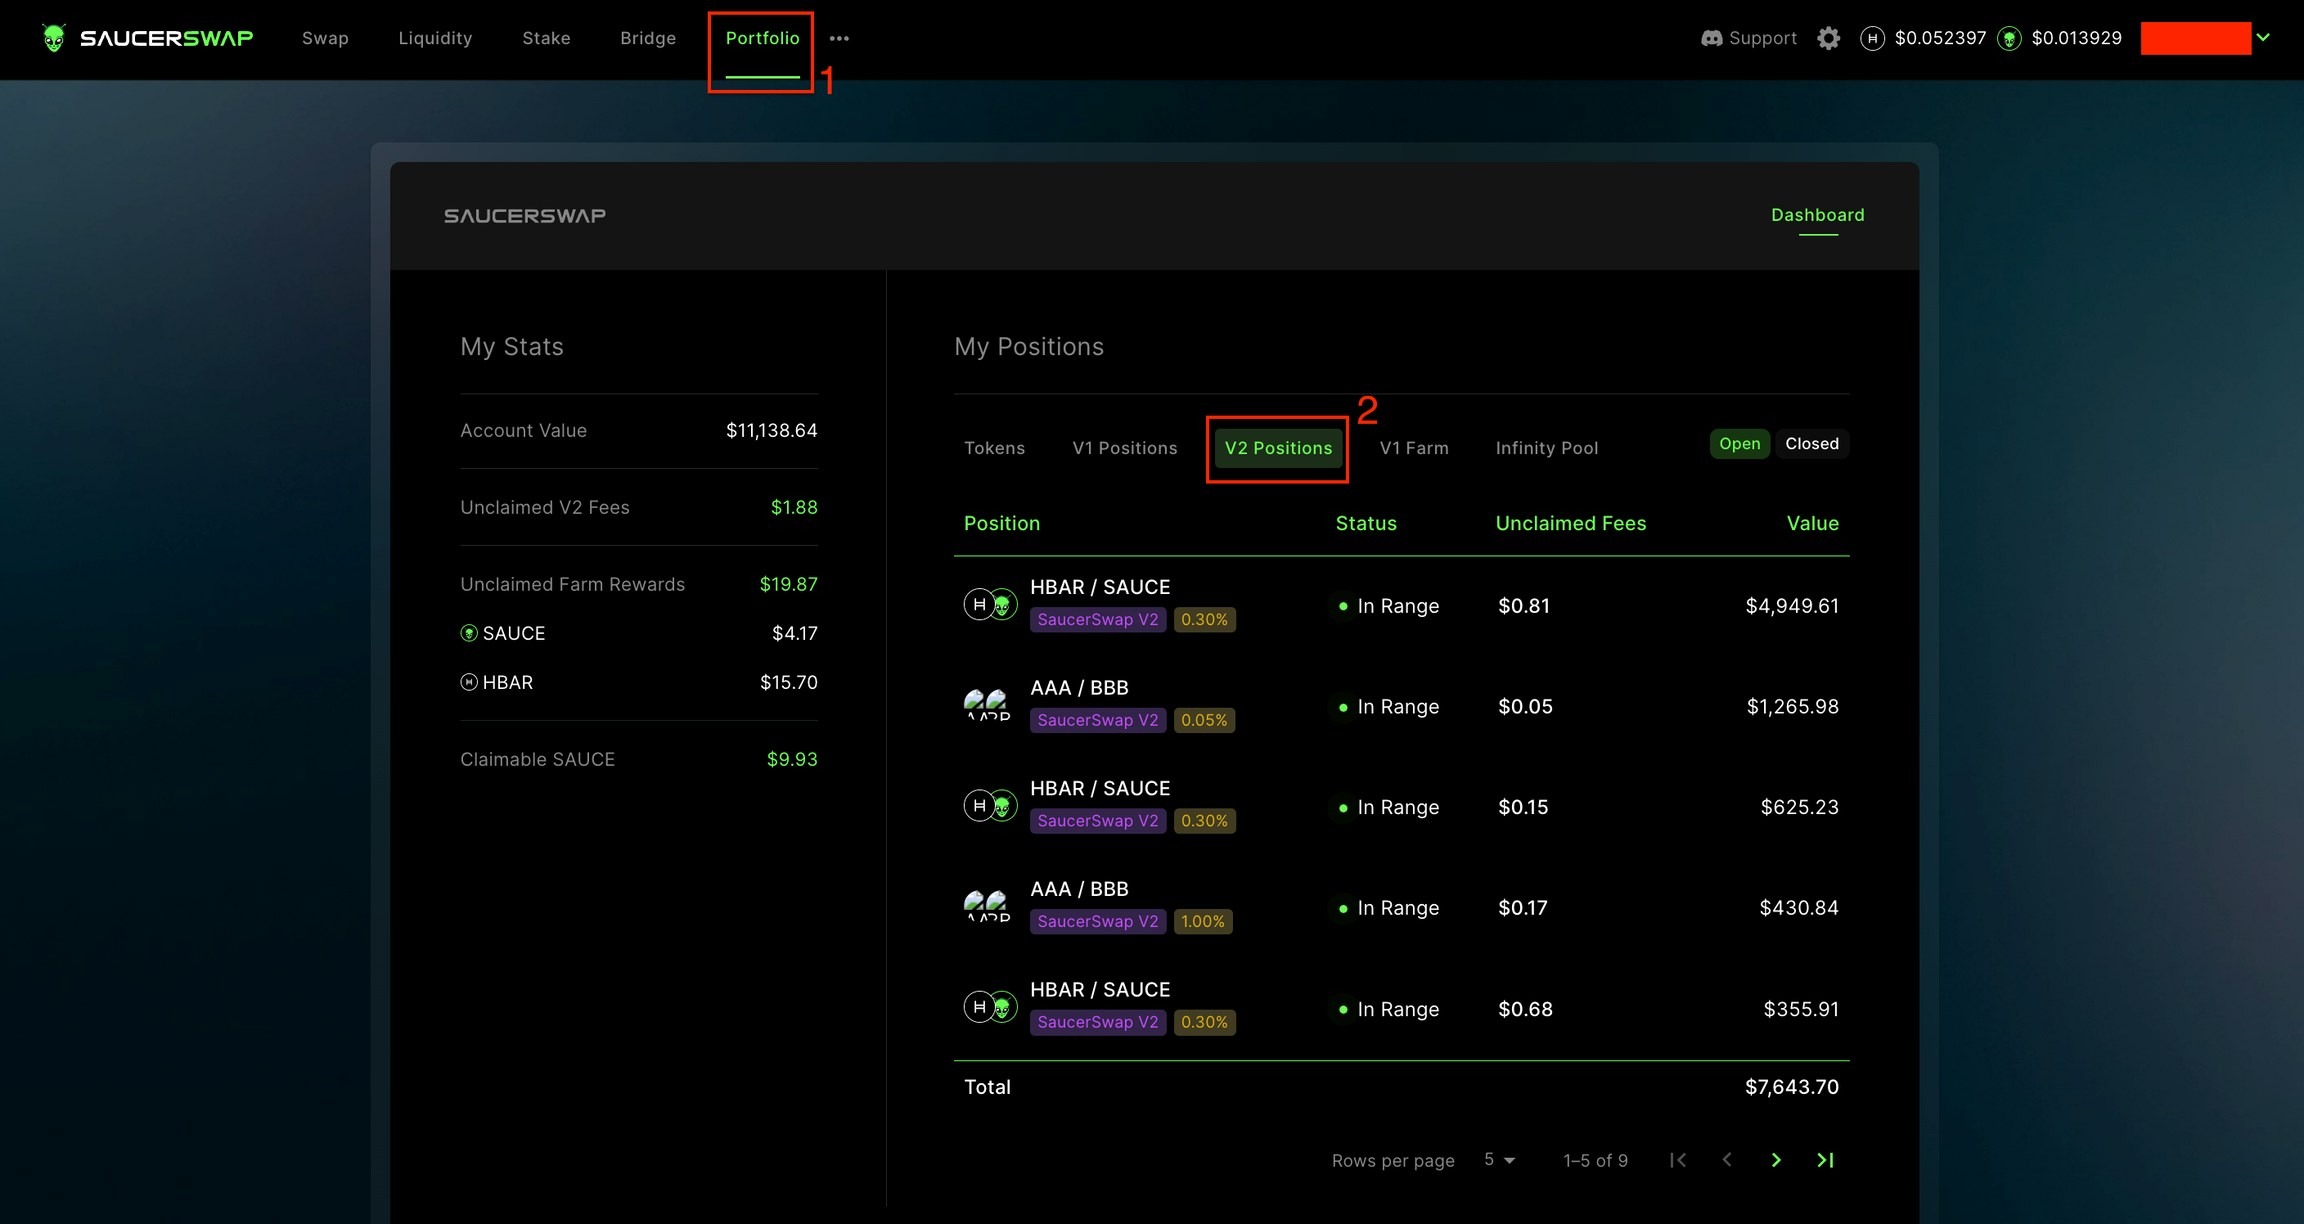
2\. **View Positions**
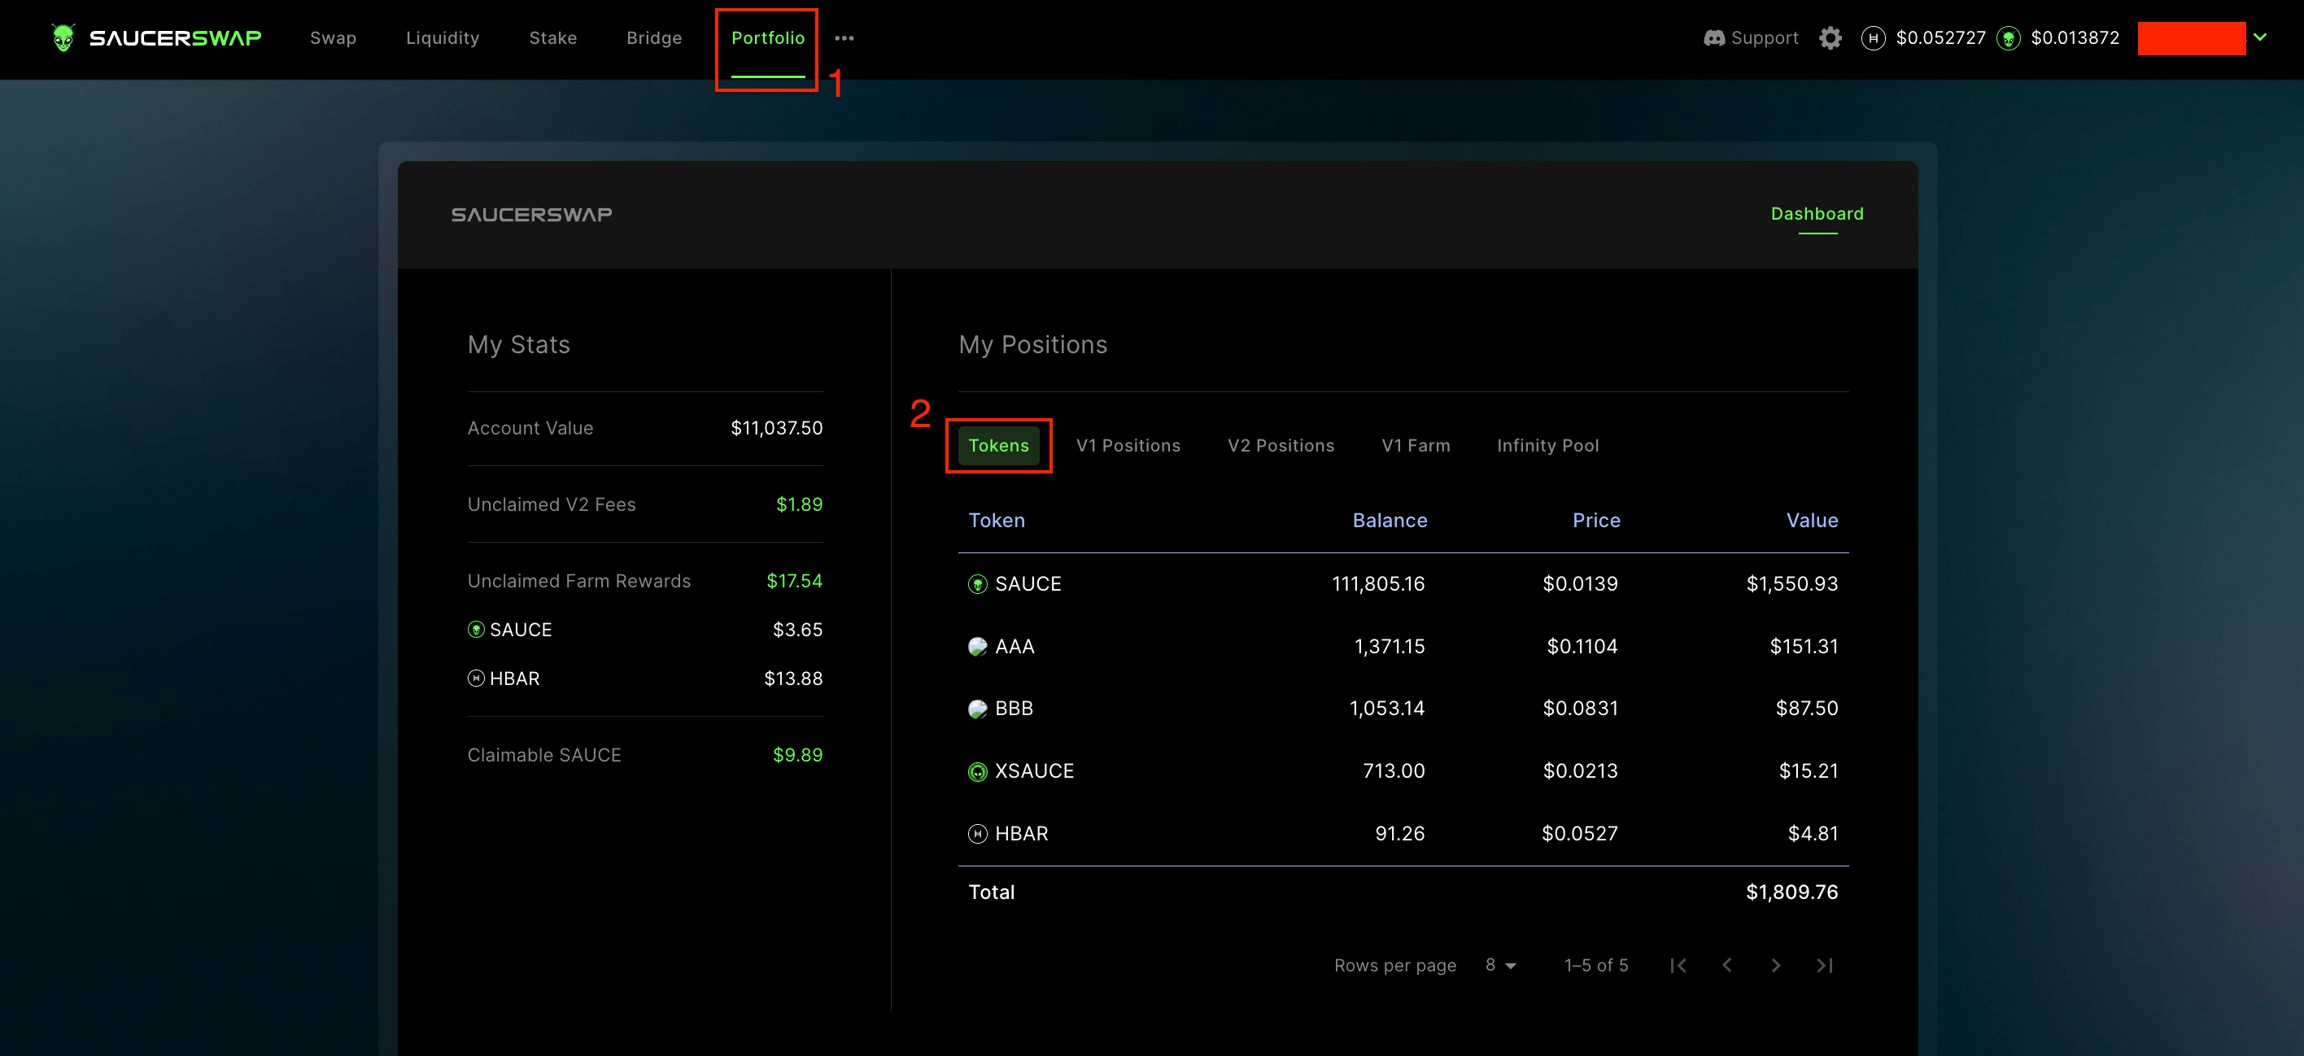
* Accessible via either the "V2 Positions" tab of the "Portfolio" page or directly from the "Liquidity" page.
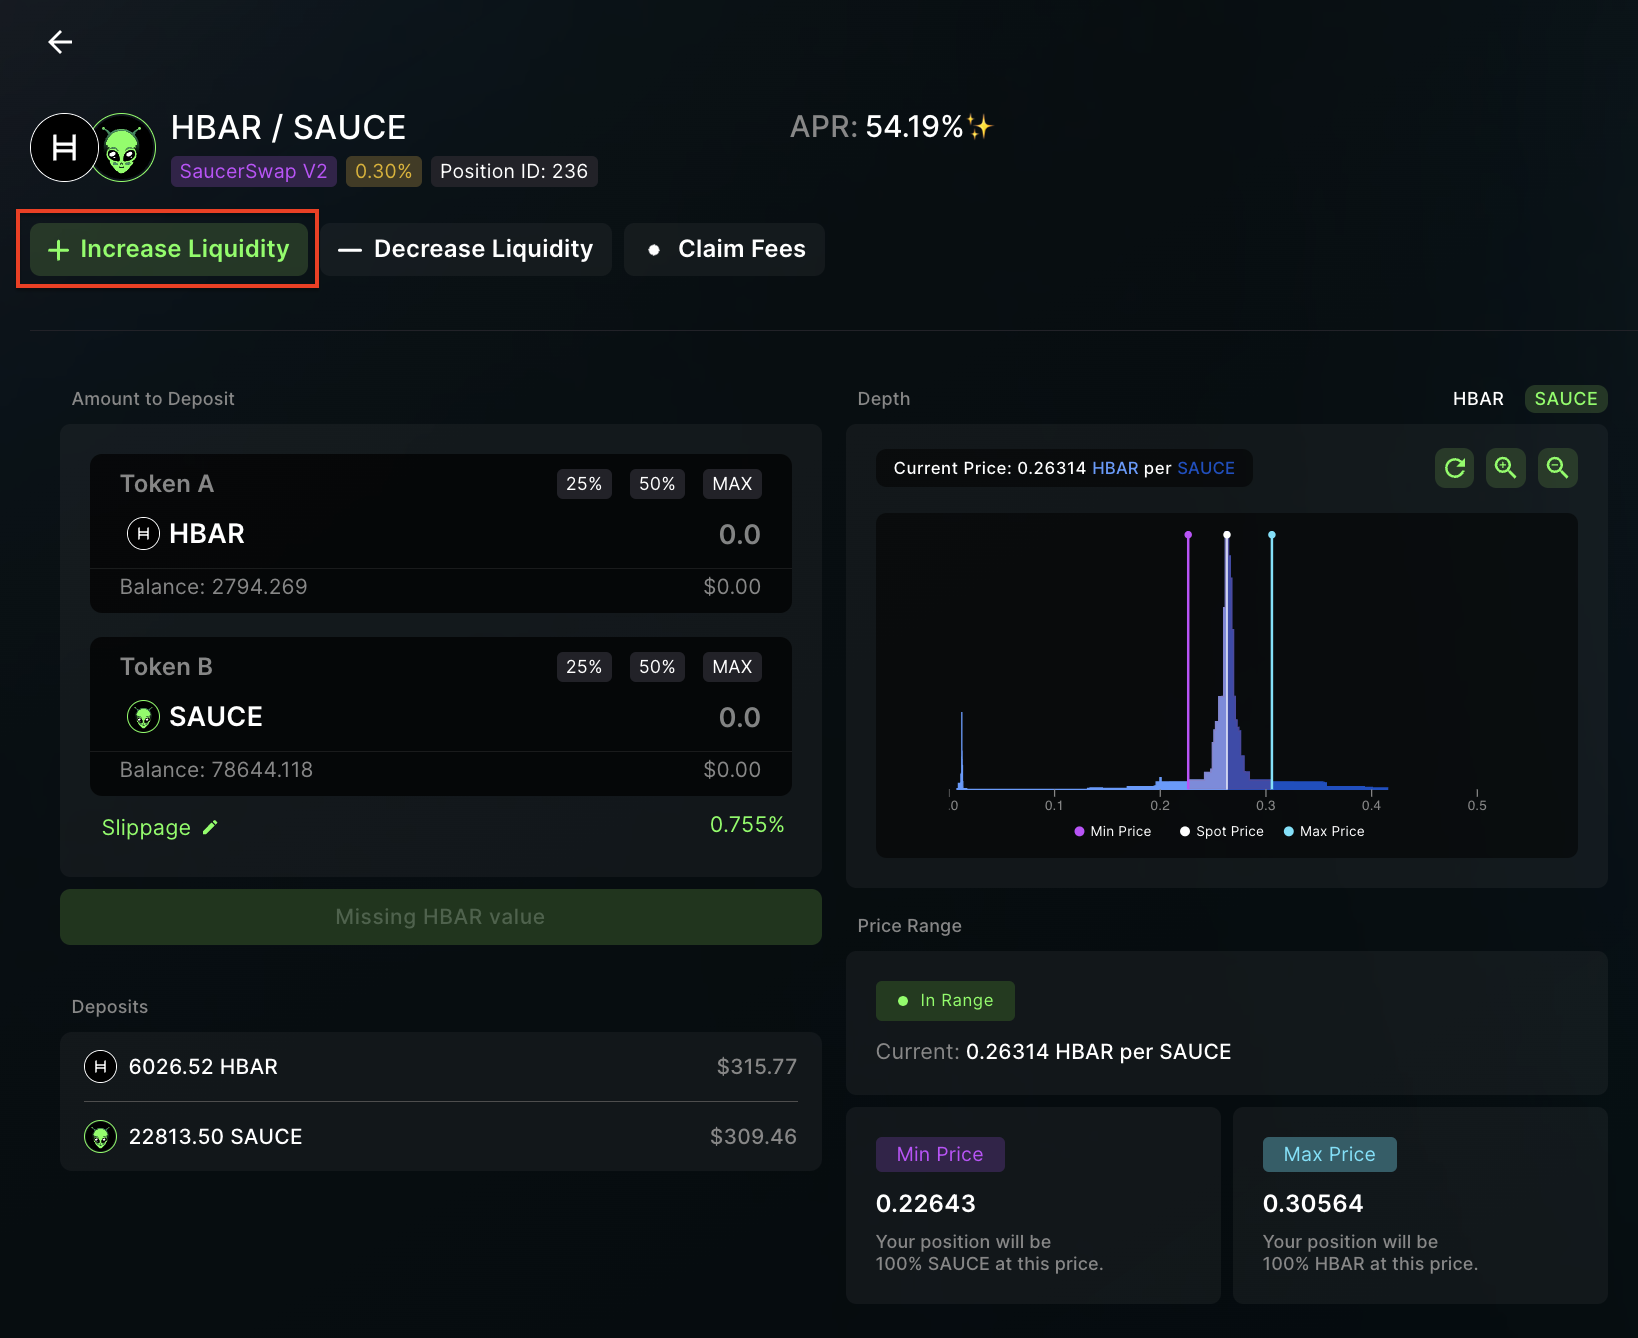
#### Increase Liquidity
1\. **Navigate Interface**
* Head over to the "Increase Liquidity" tab for the relevant position.
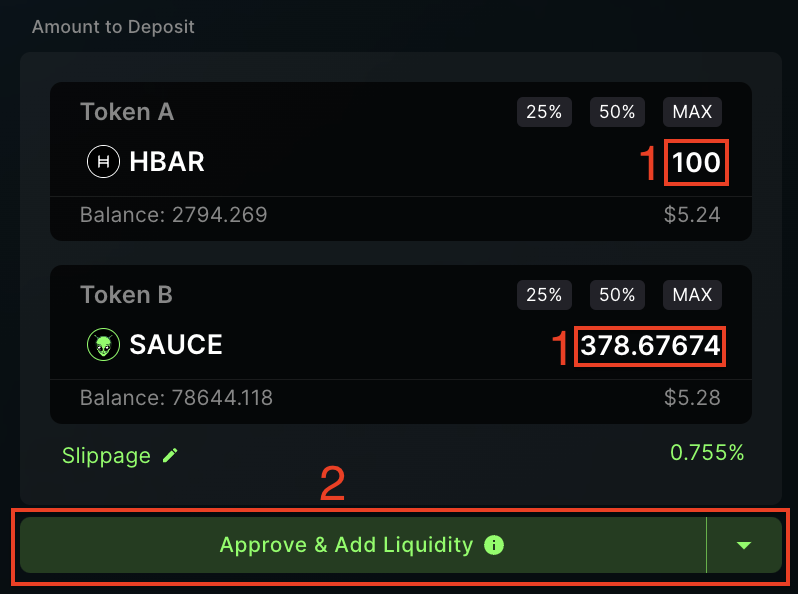
2\. **Add Liquidity**
* Enter the amount of TokenA or TokenB.
* Click "Approve & Add Liquidity."
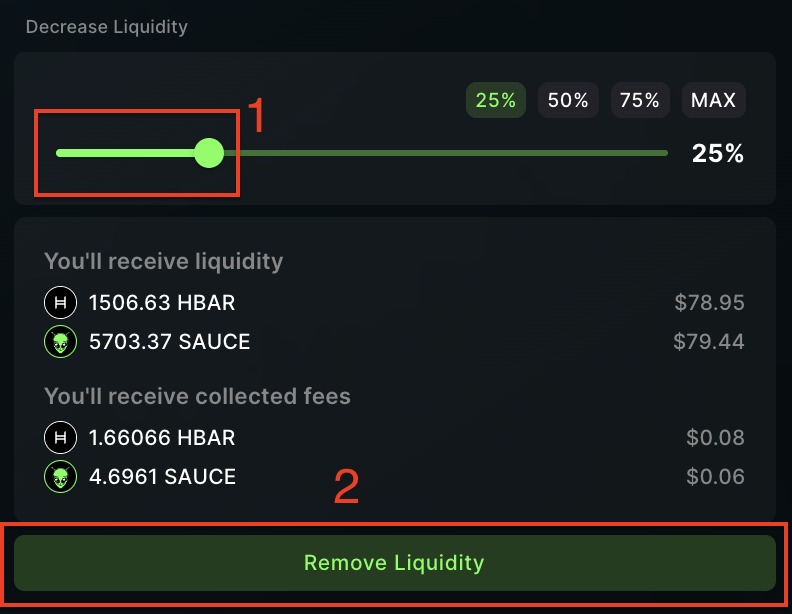
#### Decrease Liquidity
1\. **Navigate Interface**
* Head over to the "Decrease Liquidity" tab for the relevant position.
2\. **Remove Liquidity**
* Use the slider to specify how much you wish to withdraw.
* Confirm by clicking "Remove Liquidity."
#### Claim Fees
1\. **Navigate Interface**
* Head over to the "Claim Fees" tab.
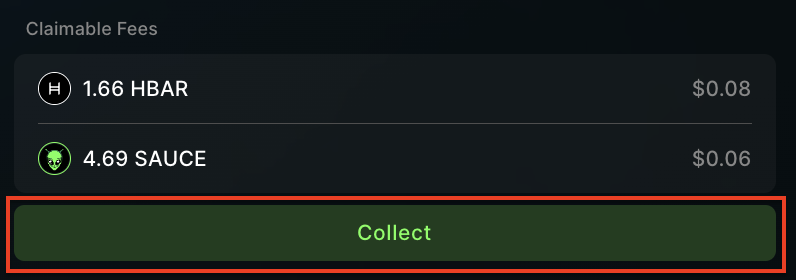
2\. **Claim LP Earnings**
* View owed amounts of TokenA and TokenB.
* Click "Collect" to initiate the process, then complete the transaction in your wallet.
## Auto Pools
### How to Create and Manage an Auto Position: Instructional Video
### How to Create and Manage an Auto Position: Written Guide
1\. **Prerequisites**
* Launch the web-app and connect your [wallet](/get-started/hedera-guide/create-hedera-wallet).
* Ensure you have sufficient [HBAR](/get-started/hedera-guide/get-hbar) for network fees and tokens for liquidity provision.
2\. **Locate Pool**
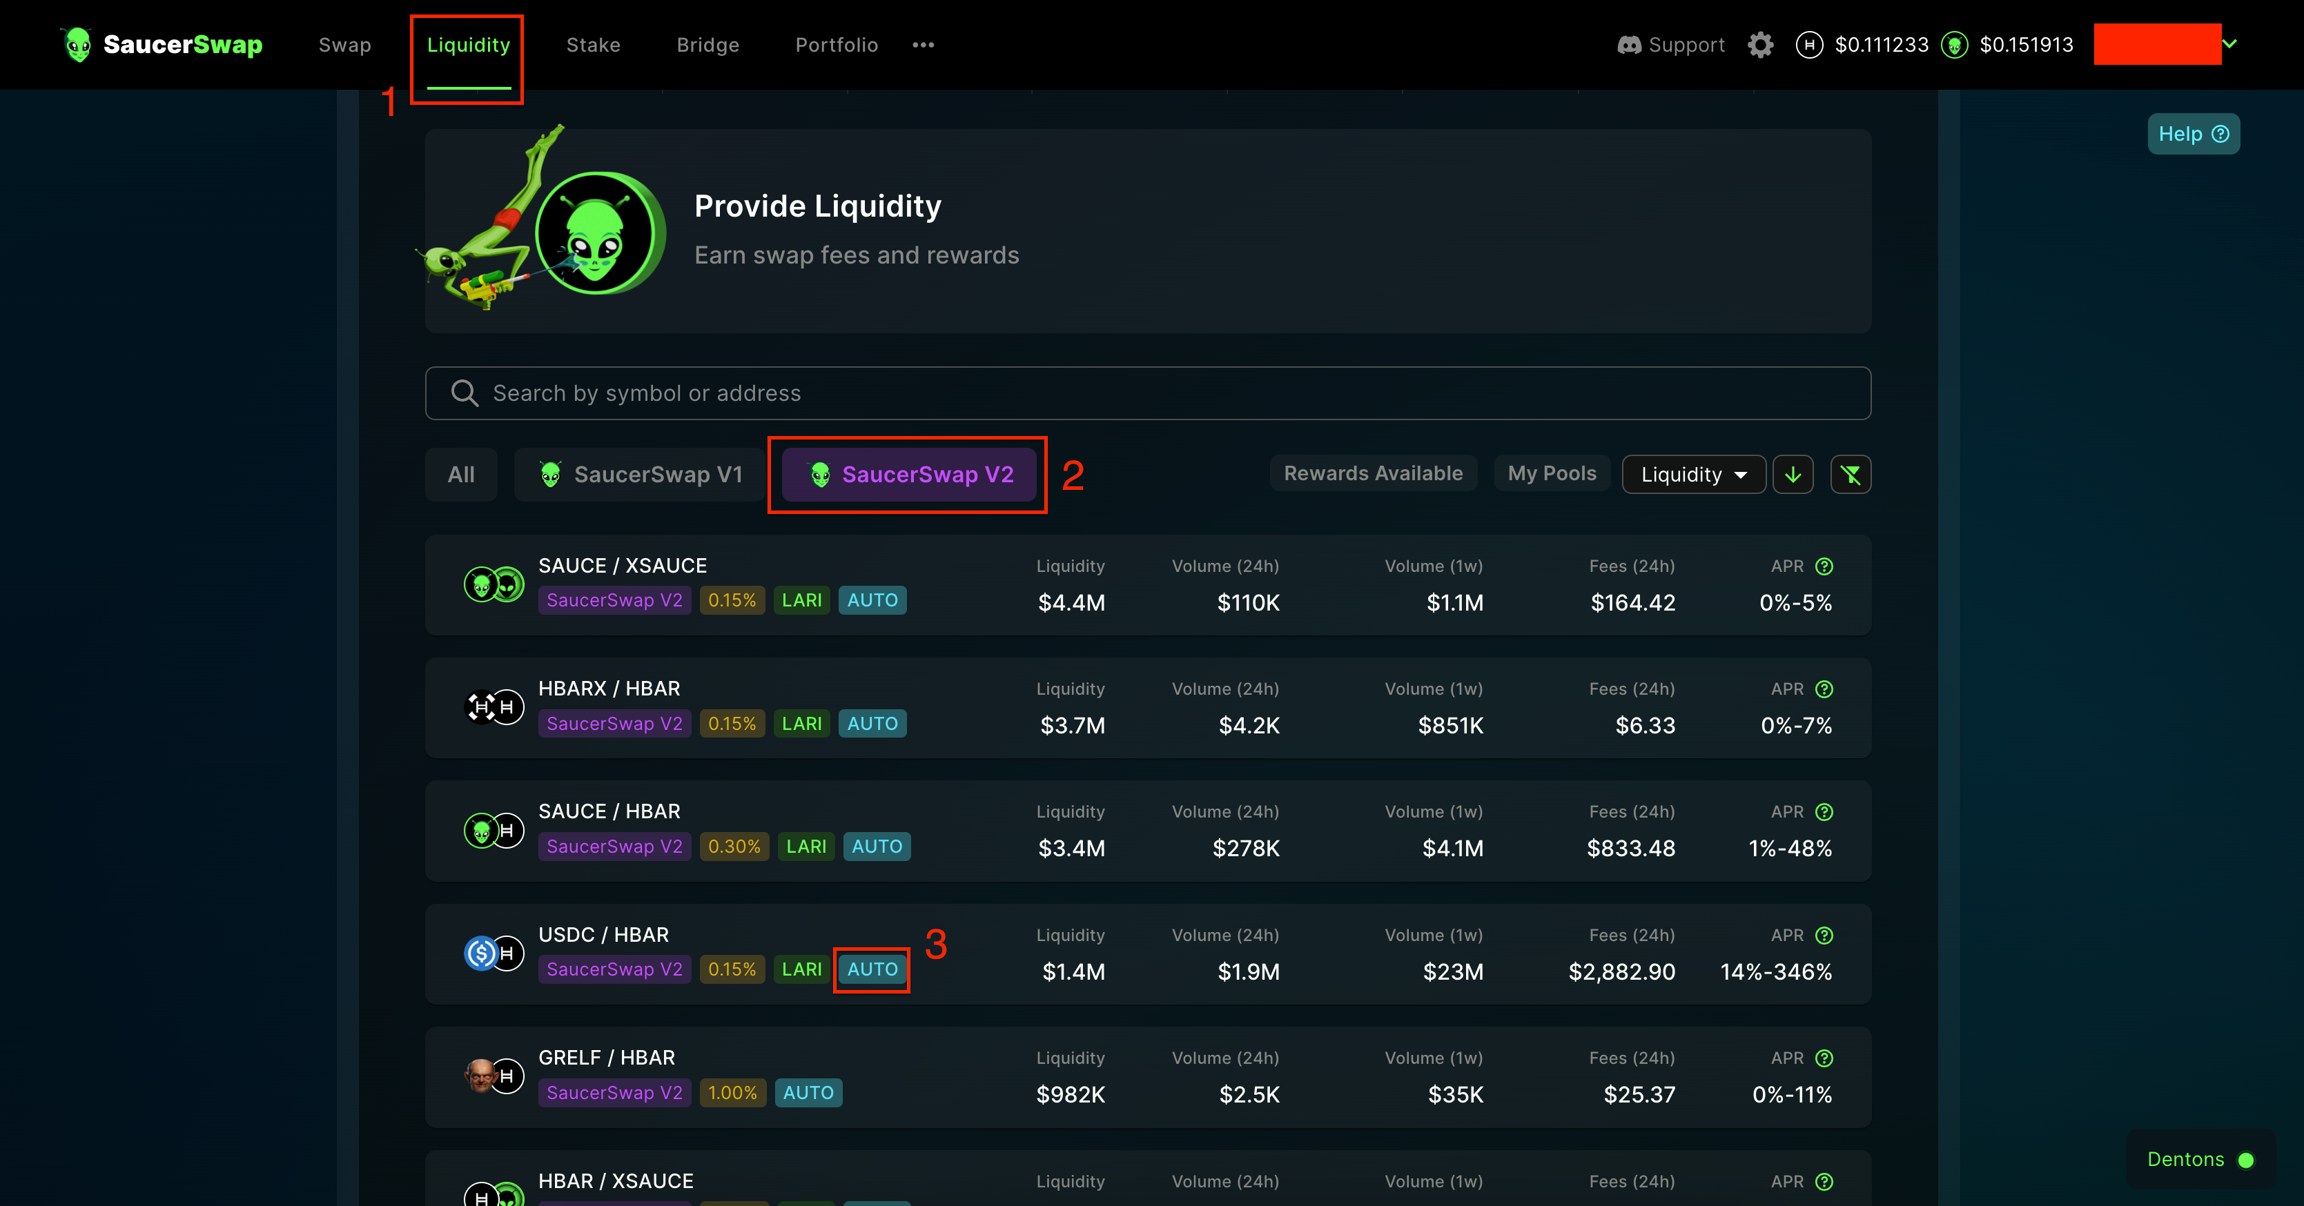
* Navigate to the "Liquidity" page.
* Select the "SaucerSwap V2" tab.
* Identify the pool where you want to provide liquidity, ensuring that it contains the 'AUTO' chip.
3\. Deposit Liquidity
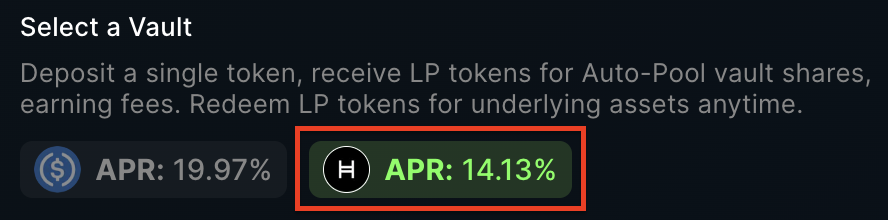
* Click "New Position," then click "Auto."
* Select the Auto Pool vault for your single asset deposit.
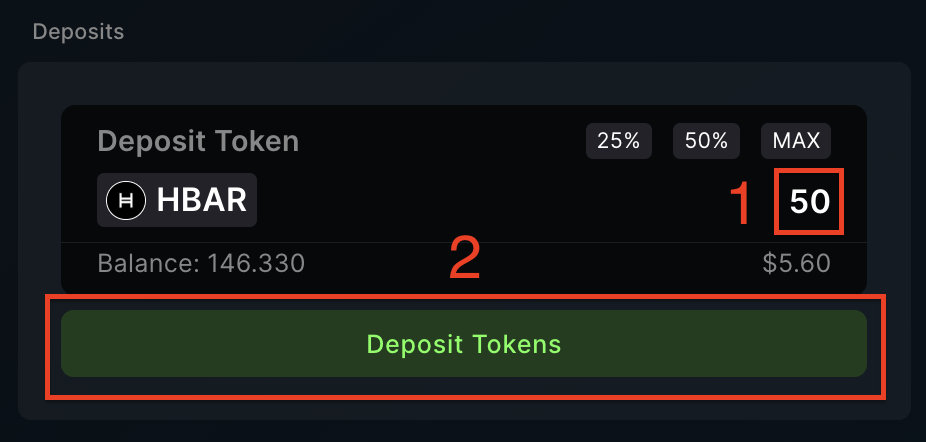
* Enter the amount of the deposit token you wish to stake in the Auto Pool vault. Then, click "Deposit Tokens" and finalize the transaction in your wallet.
4\. View and Manage Position
* Upon depositing tokens into the Auto Pool vault, you will be automatically taken to the "My Position" page.
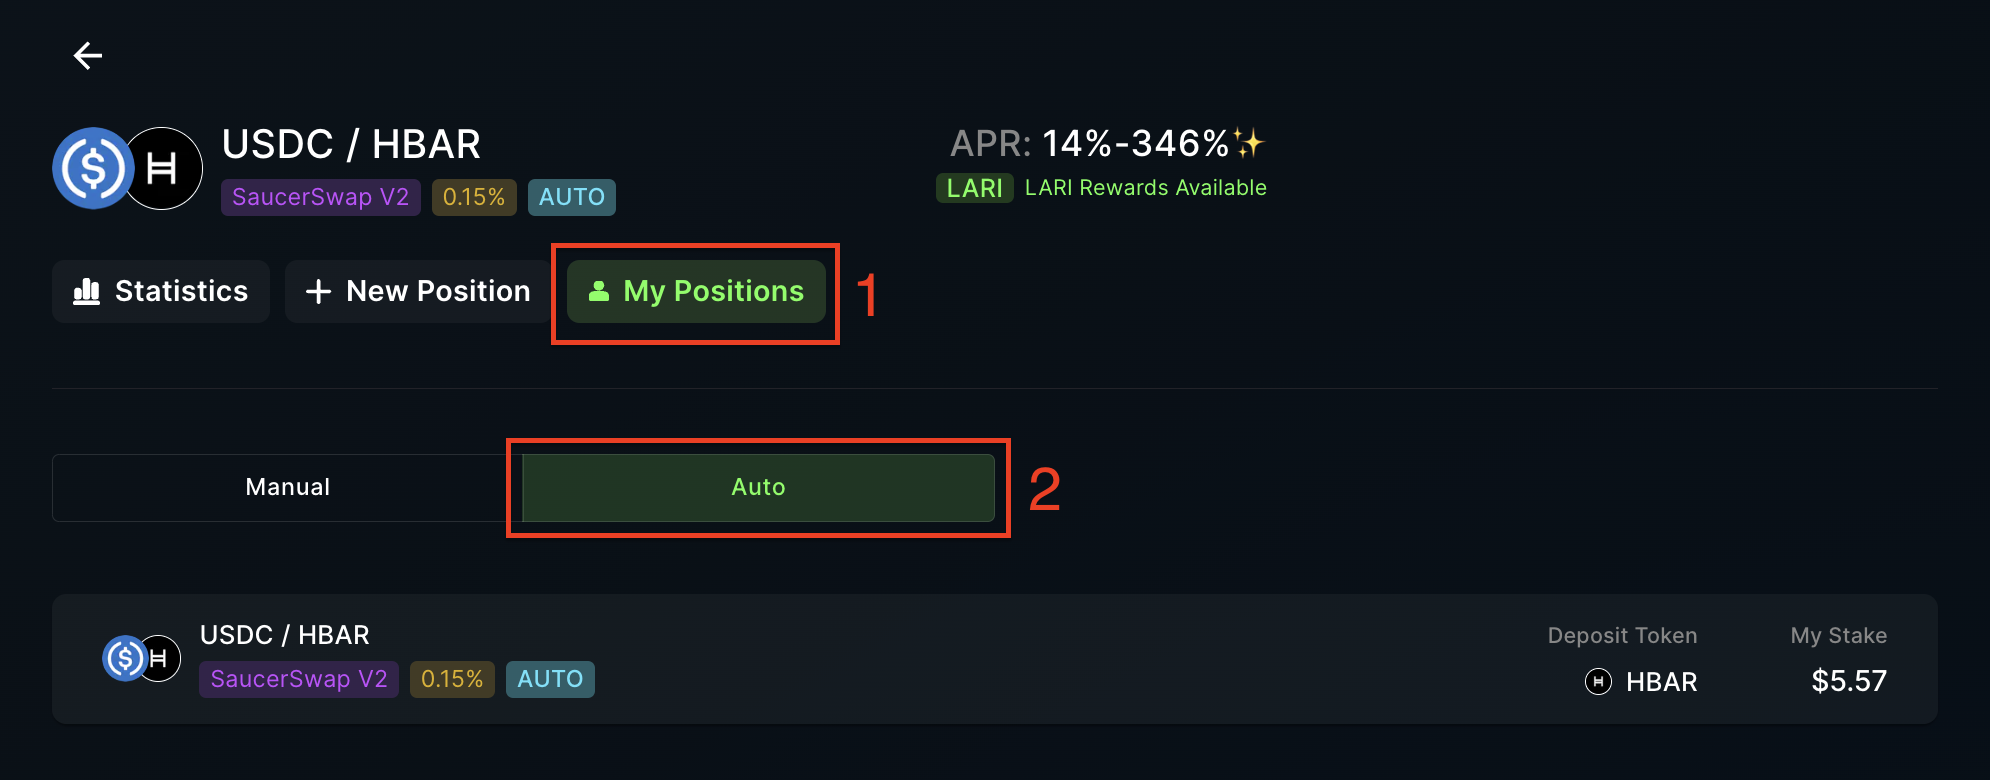
* To access Auto Pool positions from the "Liquidity" page, follow these steps:
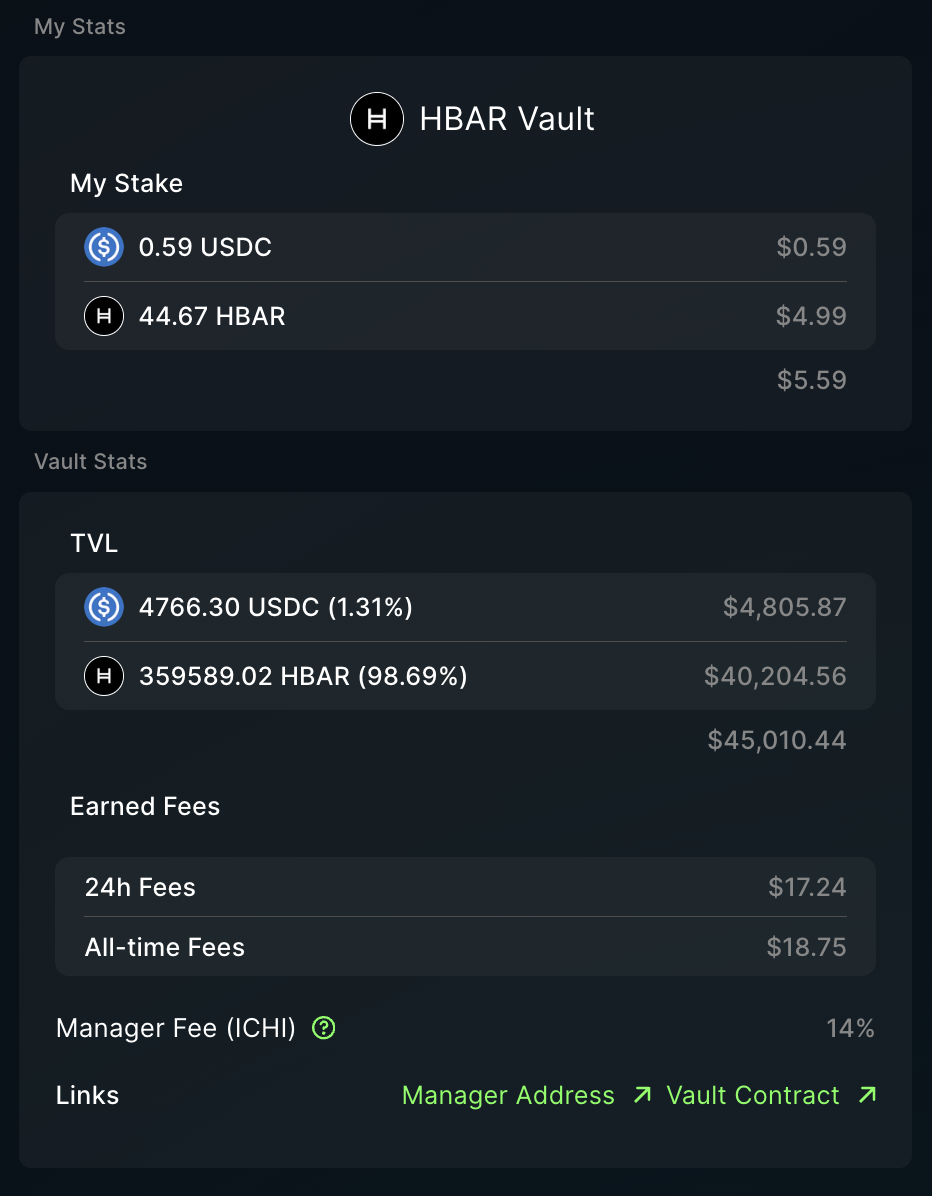
* On the "My Position" page, you can view details including your deposited liquidity, as well as the global vault statistics like TVL and Earned Fees.
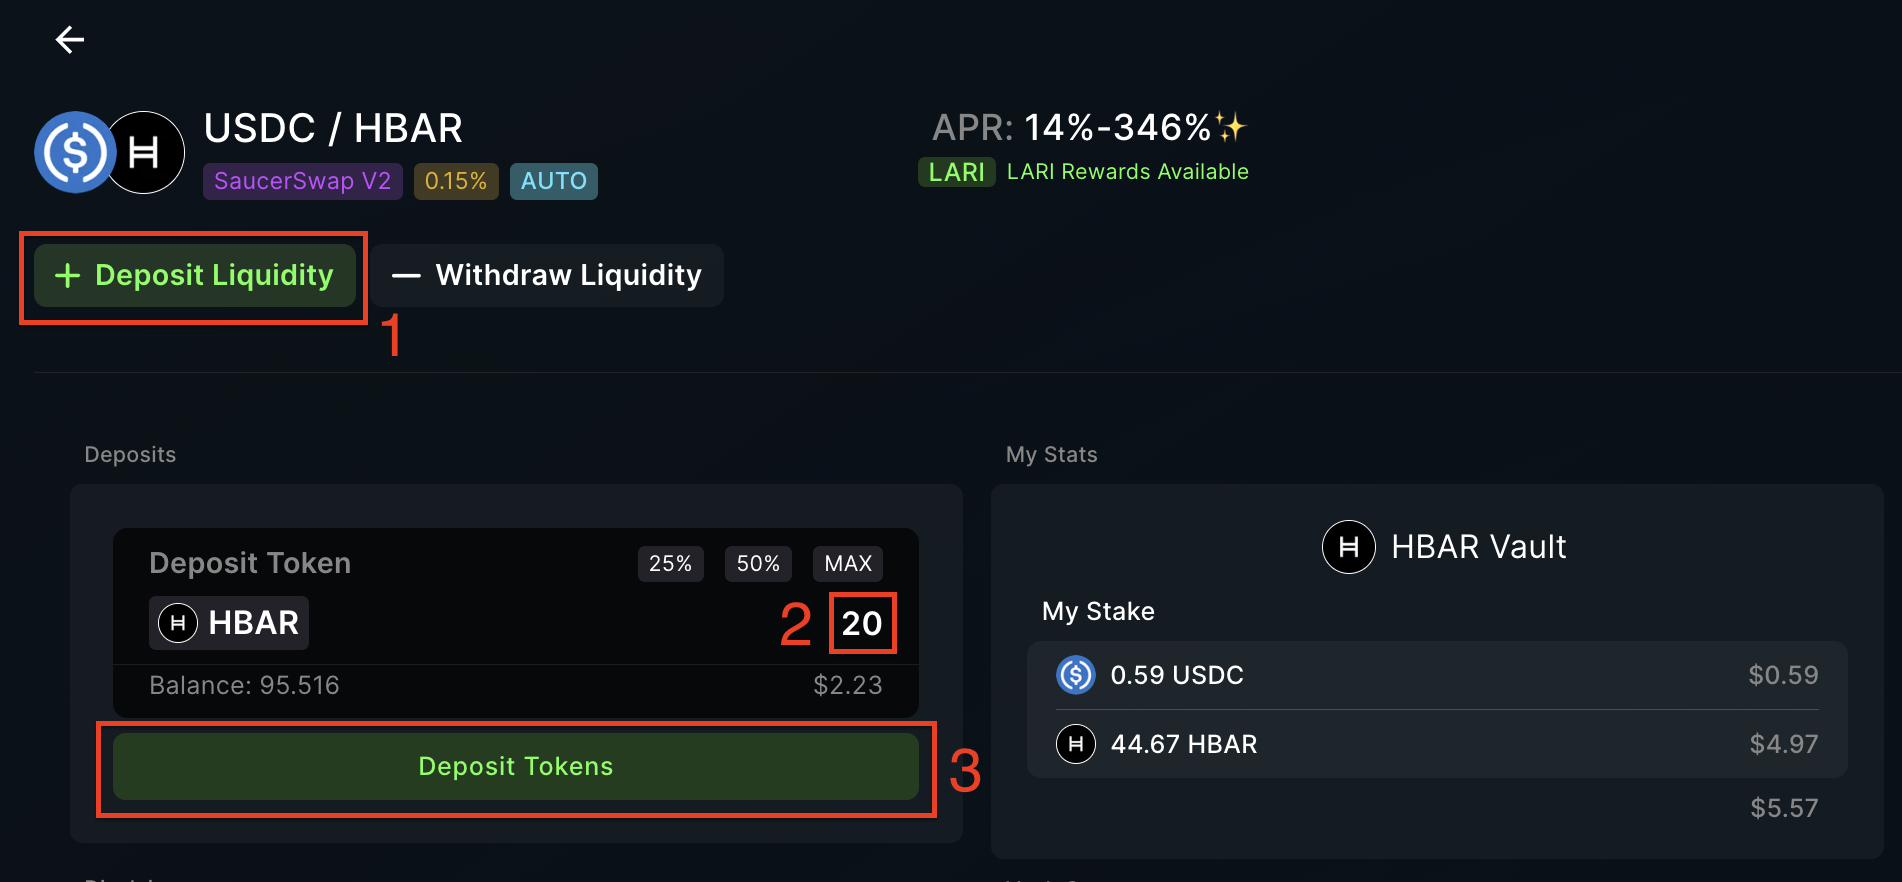
* To add more tokens to the Auto Pool vault, specify an amount in the "Deposits" section under the "Deposit Liquidity" tab, then click "Deposit Tokens" and finalize the transaction through your wallet.
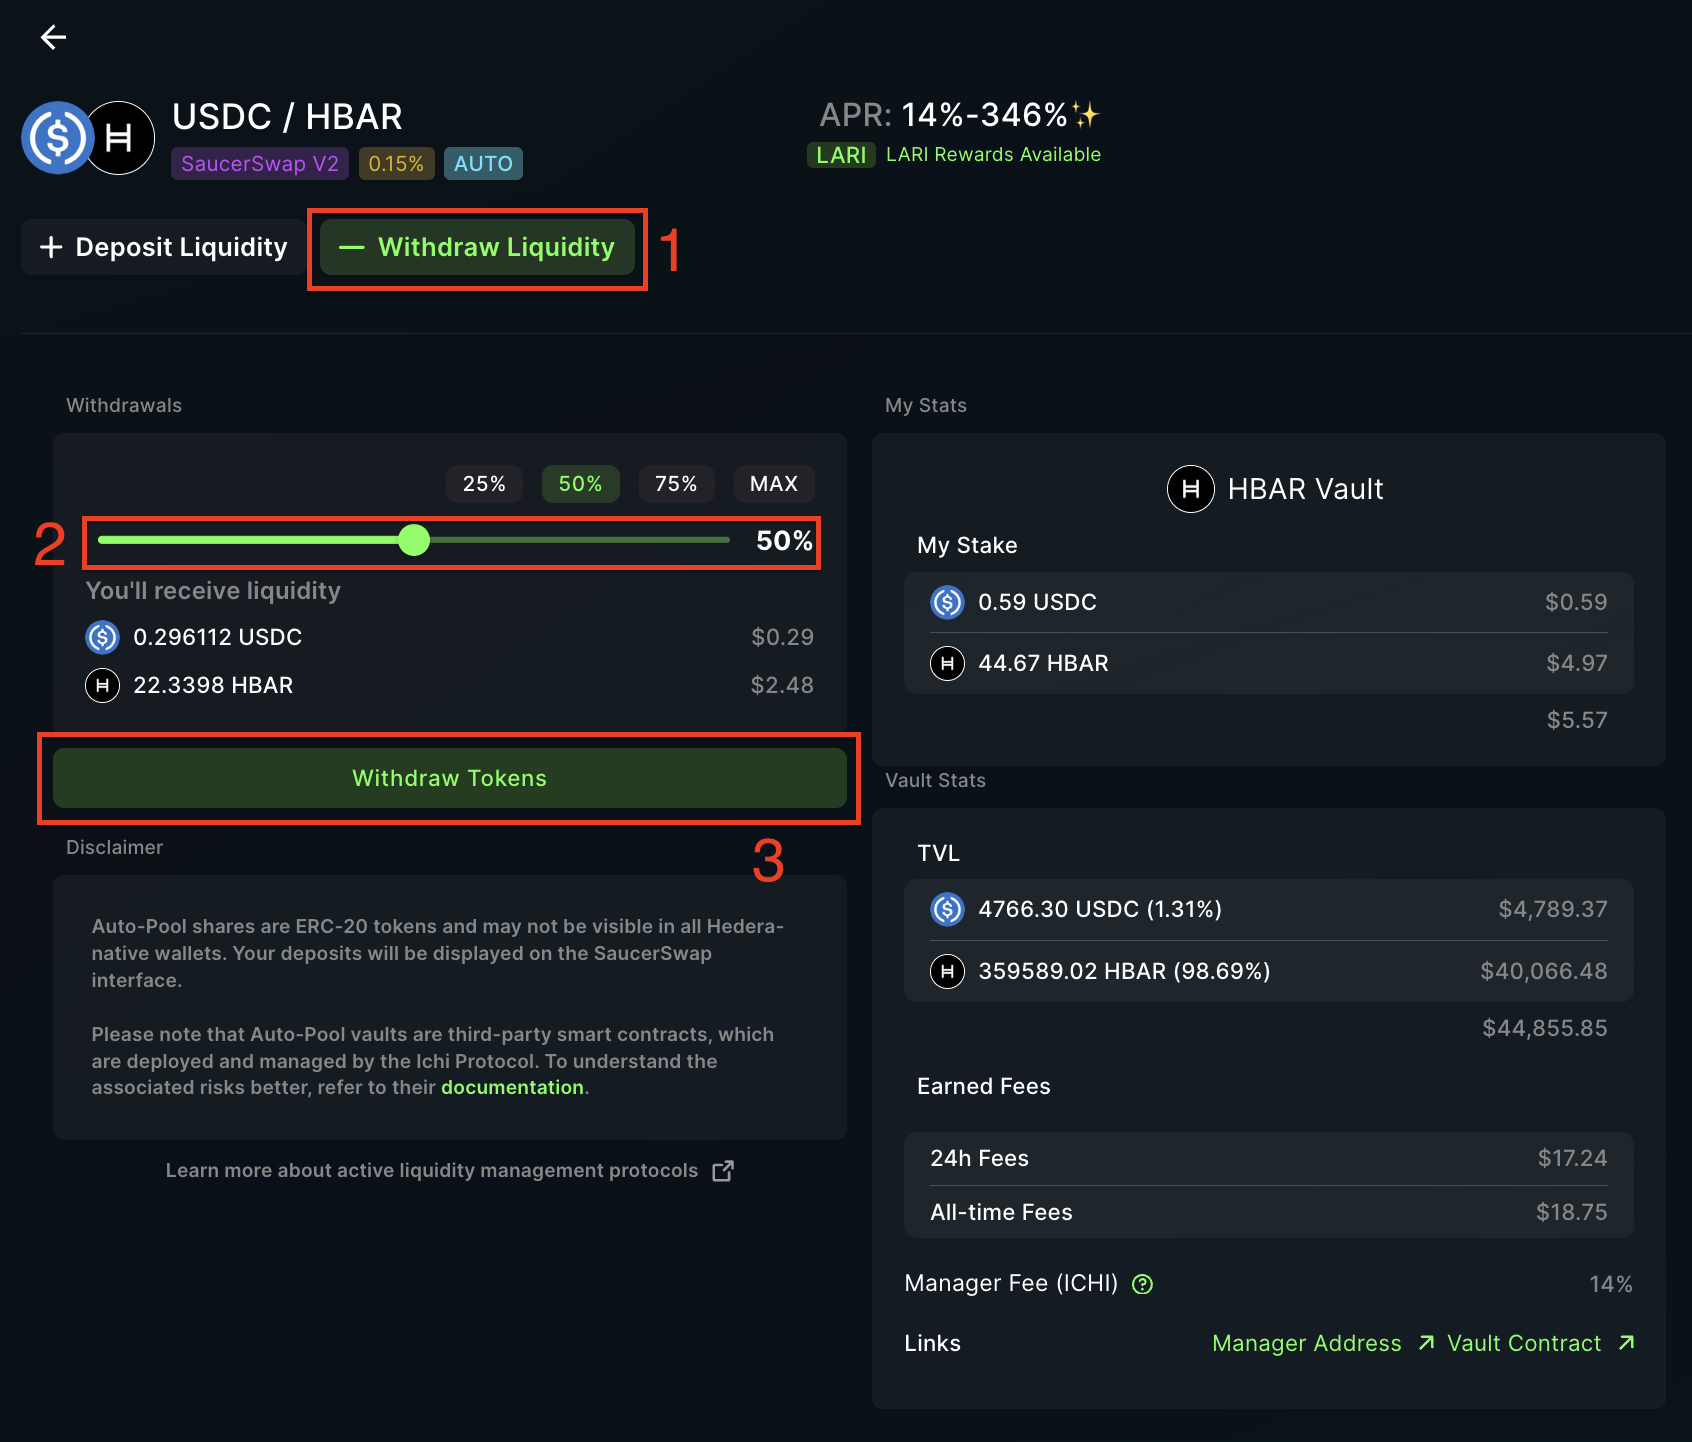
5\. Withdraw Liquidity
* For liquidity withdrawal, go to the "Withdraw Liquidity" tab and choose the quantity of tokens to withdraw using the slider or preset buttons. Then, click "Withdraw Tokens" and confirm the transaction in your wallet.
 * Ensure you have sufficient [HBAR](/get-started/hedera-guide/get-hbar) for network fees and tokens for liquidity provision.
 2\. **Locate Pool**
* Navigate to the "Liquidity" page.
* Select the "SaucerSwap V2" tab.
* Identify the pool where you want to provide liquidity.
2\. **Locate Pool**
* Navigate to the "Liquidity" page.
* Select the "SaucerSwap V2" tab.
* Identify the pool where you want to provide liquidity.
 3\. **Create Position**
* Click "New Position."
3\. **Create Position**
* Click "New Position."
 4\. **Set Price Range**
* Setting the price range is a crucial step in concentrated liquidity provision, as it determines the price points at which your liquidity is utilized for trading. Here are the different methods to set the price range:
**Volatility Strategy:** SaucerSwap offers pre-configured volatility strategies such as "Focused," "Balanced," and "Relaxed." Selecting one of these automatically sets your price range.
4\. **Set Price Range**
* Setting the price range is a crucial step in concentrated liquidity provision, as it determines the price points at which your liquidity is utilized for trading. Here are the different methods to set the price range:
**Volatility Strategy:** SaucerSwap offers pre-configured volatility strategies such as "Focused," "Balanced," and "Relaxed." Selecting one of these automatically sets your price range.
 **Manual Input:** Use the `+` and `-` buttons to manually adjust the upper and lower price limits for the position. This gives you more control but requires a good understanding of the token pair’s price dynamics.
 **Depth Chart Handles:** The interface offers a graphical depth chart where you can drag handles to set the desired price range. This method provides a visual aid, however it also requires an understanding of the token pair’s price dynamics.
 6\. **Finalize**
* Review all info and ensure your slippage tolerance is set appropriately.
* Click "Approve & Mint Position."
6\. **Finalize**
* Review all info and ensure your slippage tolerance is set appropriately.
* Click "Approve & Mint Position."
 * Complete the transaction in your wallet.
### How to Manage a Manual Position: Instructional Video
### How to Manage a Manual Position: Written Guide
1\. **Prerequisites**
* Launch the app and connect your [wallet](/get-started/hedera-guide/create-hedera-wallet).
* Ensure you have sufficient [HBAR](/get-started/hedera-guide/get-hbar) for network fees and existing liquidity positions.
2\. **View Positions**
* Accessible via either the "V2 Positions" tab of the "Portfolio" page or directly from the "Liquidity" page.
* Complete the transaction in your wallet.
### How to Manage a Manual Position: Instructional Video
### How to Manage a Manual Position: Written Guide
1\. **Prerequisites**
* Launch the app and connect your [wallet](/get-started/hedera-guide/create-hedera-wallet).
* Ensure you have sufficient [HBAR](/get-started/hedera-guide/get-hbar) for network fees and existing liquidity positions.
2\. **View Positions**
* Accessible via either the "V2 Positions" tab of the "Portfolio" page or directly from the "Liquidity" page.
 #### Increase Liquidity
1\. **Navigate Interface**
* Head over to the "Increase Liquidity" tab for the relevant position.
#### Increase Liquidity
1\. **Navigate Interface**
* Head over to the "Increase Liquidity" tab for the relevant position.
 2\. **Add Liquidity**
* Enter the amount of TokenA or TokenB.
* Click "Approve & Add Liquidity."
2\. **Add Liquidity**
* Enter the amount of TokenA or TokenB.
* Click "Approve & Add Liquidity."
 #### Decrease Liquidity
1\. **Navigate Interface**
* Head over to the "Decrease Liquidity" tab for the relevant position.
#### Decrease Liquidity
1\. **Navigate Interface**
* Head over to the "Decrease Liquidity" tab for the relevant position.
 2\. **Remove Liquidity**
* Use the slider to specify how much you wish to withdraw.
* Confirm by clicking "Remove Liquidity."
2\. **Remove Liquidity**
* Use the slider to specify how much you wish to withdraw.
* Confirm by clicking "Remove Liquidity."
 #### Claim Fees
1\. **Navigate Interface**
* Head over to the "Claim Fees" tab.
#### Claim Fees
1\. **Navigate Interface**
* Head over to the "Claim Fees" tab.
 2\. **Claim LP Earnings**
* View owed amounts of TokenA and TokenB.
* Click "Collect" to initiate the process, then complete the transaction in your wallet.
2\. **Claim LP Earnings**
* View owed amounts of TokenA and TokenB.
* Click "Collect" to initiate the process, then complete the transaction in your wallet.
 ## Auto Pools
### How to Create and Manage an Auto Position: Instructional Video
### How to Create and Manage an Auto Position: Written Guide
1\. **Prerequisites**
* Launch the web-app and connect your [wallet](/get-started/hedera-guide/create-hedera-wallet).
## Auto Pools
### How to Create and Manage an Auto Position: Instructional Video
### How to Create and Manage an Auto Position: Written Guide
1\. **Prerequisites**
* Launch the web-app and connect your [wallet](/get-started/hedera-guide/create-hedera-wallet).
 3\. Deposit Liquidity
* Click "New Position," then click "Auto."
3\. Deposit Liquidity
* Click "New Position," then click "Auto."
 * Select the Auto Pool vault for your single asset deposit.
 * Enter the amount of the deposit token you wish to stake in the Auto Pool vault. Then, click "Deposit Tokens" and finalize the transaction in your wallet.
 4\. View and Manage Position
* Upon depositing tokens into the Auto Pool vault, you will be automatically taken to the "My Position" page.
* To access Auto Pool positions from the "Liquidity" page, follow these steps:
4\. View and Manage Position
* Upon depositing tokens into the Auto Pool vault, you will be automatically taken to the "My Position" page.
* To access Auto Pool positions from the "Liquidity" page, follow these steps:
 * On the "My Position" page, you can view details including your deposited liquidity, as well as the global vault statistics like TVL and Earned Fees.
 * To add more tokens to the Auto Pool vault, specify an amount in the "Deposits" section under the "Deposit Liquidity" tab, then click "Deposit Tokens" and finalize the transaction through your wallet.
 5\. Withdraw Liquidity
* For liquidity withdrawal, go to the "Withdraw Liquidity" tab and choose the quantity of tokens to withdraw using the slider or preset buttons. Then, click "Withdraw Tokens" and confirm the transaction in your wallet.
5\. Withdraw Liquidity
* For liquidity withdrawal, go to the "Withdraw Liquidity" tab and choose the quantity of tokens to withdraw using the slider or preset buttons. Then, click "Withdraw Tokens" and confirm the transaction in your wallet.